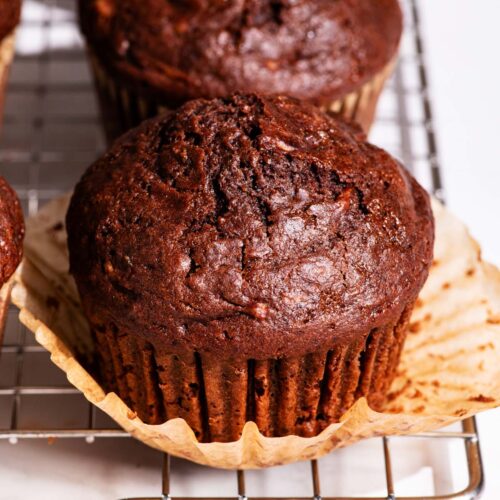
A flavourful darker sourdough loaf, this oatmeal molasses sourdough bread is baked in a loaf tin to makes things a little simpler. It's a slightly sweet bread with deep molasses flavour and a bit of texture from the rolled oats. This is the ideal sourdough for toasting, made using a straightforward method with no need for a Dutch oven.
For more flavour-packed sourdough bread recipes, try our savoury sourdough olive bread, wholesome 100% whole wheat sourdough bread, or sweet enriched sourdough hot cross buns.

Jump to:
Ingredients

Ingredient Notes and Substitutions
- Flour: if preferred, use strong bread flour instead of all-purpose flour.
- Rolled oats: quick-cook oats aren't nearly as good and steel cut won't work. Be sure to use rolled oats.
- Molasses: this must be fancy molasses - it might simply be labeled as molasses - but don't use blackstrap. Blackstrap molasses is very bitter and shouldn't be used in baking.
- Starter: a 100% hydration active sourdough starter or levain, made with any type of flour.
Use the JUMP TO RECIPE button at the top, or scroll to the bottom of the post to see the printable recipe card with full ingredient measurements and complete instructions.
Method

Step 1: mix the water, starter, molasses, and salt in a large bowl.
Step 2: add the flour and oats and stir well.
Step 3: cover and let the dough rest.
Step 4: do your stretches and folds over the next several hours, then let the dough rise overnight at room temperature.

Step 5: shape the dough on a lightly floured surface.
Step 6: let the dough rise again in a banneton in the fridge.
Step 7: turn out onto parchment paper, gently shape into an oval, and score.
Step 8: bake until golden brown, about 50 minutes.
Top Tips
- Mist the banneton: lightly mist the inside of the banneton with water, using a spray bottle, to help the rice flour stick. This will make for a loaf that's much easier to release later.
- Use a lame: for the best scoring, use a lame or fresh razor (you can get them at pharmacies). A very sharp knife will do the trick too.
- Add a second loaf tin: don't worry if you've just got one, it'll still be excellent baked without the 'lid' – but if you have got a spare loaf tin, it helps a bit with oven spring to place it on top of the bread while it's baking to create a slightly steamy environment.
Recipe Notes
This recipe allows for some flexibility in the timing for the stretches and folds, and we've spaced them from anywhere between 20 minutes between each set to 2 hours between during testing. As long as they're done, you can alter the timing based on your schedule. We have written it out with a standard 20 minute interval in the recipe card to keep things straightforward but you can note that it can be adjusted.
If you don't have a banneton, you can shape the dough and let it rise directly in the loaf tin like we do for our sourdough pan loaf. Kelly found in her testing that the oven spring was slightly less pronounced when using that method for the molasses sourdough, but it will still work. An oval banneton is even better than a round one for this recipe, but use what you have on hand.
Don't worry if you don't have a shower cap to cover the banneton with. A damp tea towel can be used as long as it's kept damp so be sure to check it periodically.
How to Store
Storage: wrap the cooled loaf tightly in beeswax wrap or store it in an airtight container. It will keep at room temperature for 2 to 3 days. When stored longer the loaf will start to dry out but can be toasted to refresh.
Freezing: freeze the loaf in an airtight container for up to 3 months. Thaw at room temperature before slicing. If freezing in individual slices, thaw them directly in the toaster.


If you make this Sourdough Molasses Bread recipe or any other sourdough bread recipes on the Baked Collective, please take a moment to rate the recipe and leave a comment below. It’s such a help to others who want to try the recipe. For more baking, follow along on Instagram, TikTok, and YouTube.
Oatmeal Molasses Sourdough Bread
Equipment
- Large mixing bowl
- Shower cap, damp tea towel, or similar covering
- Banneton basket
- Spray bottle with mist action (optional)
- 2 Standard 9 x 5 inch (21.5 x 11.5 cm) loaf tins
- baking sheet
- Scoring tool (lame, razor blade, or sharp knife)
- Cooling rack
Ingredients
- 350 grams water, room temperature to cool
- 50 grams active sourdough starter
- 120 grams fancy molasses, not blackstrap
- 15 grams fine grain salt
- 500 grams all-purpose flour, or bread flour
- 70 grams rolled oats, not quick oats
Instructions
DAY ONE
- In a large mixing bowl, whisk the water, sourdough starter, molasses, and salt together until combined.50 grams active sourdough starter, 350 grams water, 120 grams fancy molasses, 15 grams fine grain salt
- Add the flour and rolled oats to the bowl. Stir until no dry bits remain. Cover the bowl with a shower cap or tea towel plus plate and let the dough rest for 4 hours at room temperature.500 grams all-purpose flour, 70 grams rolled oats
- Perform four sets of stretches and folds at some point during this resting period, once every 20 minutes. The dough will be wet. Run your hands under a tap before doing the stretches. Cover the bowl again and let the dough rise on the counter or in a draft-free place overnight.
DAY TWO
- The next day, check that the dough has doubled in size. Lightly mist the inside of a banneton with water and dust with rice flour. Perform one set of stretches and folds to form the dough into a smooth ball. Flip the dough over and perform tension pulls to create a taut surface. See how to shape a boule. If you find the dough too difficult to work with, refrigerate for a few hours before shaping.
- Place the dough, seam side up, into the prepared banneton. Lightly mist the top with water, cover it with a shower cap, and refrigerate for up to three days.
READY TO BAKE
- Preheat the oven to 450ºF (230ºC). Cut a piece of parchment paper to line a loaf tin, leaving an overhang to use as handles.
- Gently turn the dough out from the banneton onto the parchment paper. Lightly dust the top with rice flour and smooth it with your hands. Gently press the long sides of the dough with your hands to form the dough into more of an oval shape. Lower the dough into the loaf tin using the parchment paper handles.
- Score the top of the loaf however you like, then mist it lightly with water. Cover the tin with a second tin turned upside down like a lid (optional).
- Place the tin on a baking sheet and bake covered for 30 minutes. Remove the top tin and continue baking uncovered for 20 to 25 minutes or until the crust reaches your preferred colour.
- Immediately turn the loaf out onto a cooling rack. Allow it to cool for 4 to 6 hours before slicing to avoid gumminess. See how to store sourdough bread.
Notes
Nutrition
Nutrition information is an estimate and is provided as a courtesy. For precise nutritional data, please calculate it independently using your preferred nutrition calculator.
This post may contain affiliate links. If you purchase through these links, we may earn a small commission, at no additional cost to you.
 Did you make this recipe?Please consider leaving us a rating and a comment. It helps others find our work, which genuinely supports what we do. Thank you!
I made this yesterday and also found the dough to be extremely wet. It was a little tricky to do the stretch and folds (I had to wet my hands first). That said, once I refrigerated the dough it was much easier to work with the next day and the resulting bread was delicious !!!! One of our favorite sourdough loafs (and I make a lot).
Just to clarify, is the bulk fermentation finished after the (4-hour to all day) period with the stretch and folds, or does the dough rise again overnight? The recipe card mentions a 4-hour rise then an overnight rise before shaping and putting in fridge, but the post itself just mentions the initial rise.
Hi Kathy, thanks for pointing this out. We've update the recipe card to be more clear.
I've been baking a variety of home made breads (from bagels to challah to focaccia, to sourdough rye to Japanese milk breads several times a week) both sourdough and commercial yeast raised for more than 4 decades. I liked this recipe. It was simple, straightforward, good oven spring and has a nice, light, flavour profile.
One caveat, I needed fully another 110 gms of flour with this volume of water. That's more than a 20% increase! After several attempts with more flour, I'm going to try it with 75-100ml less water.
Hi there - Kelly tested this recipe five times before posting and tested again when you mentioned that you needed more flour. We're wondering if you considered that the oats will reduce the overall hydration level as they absorb water, and if you added more flour immediately after mixing, before the oats could hydrate. That would make it seem like the dough is too wet.