If you’re new to sourdough baking or you struggle with producing gorgeous artisan-style boules, learning how to bake sourdough in a loaf pan is a forgiving place to start. As much as we love a beautifully scored and decorated boule, Sophie’s method, which uses a standard 9×5-inch (23×13-cm) loaf tin, is practical and beginner-friendly. She first baked pan loaves during her years spent working in a Vancouver bakery, and it’s still one of her favourite ways to make sourdough at home.
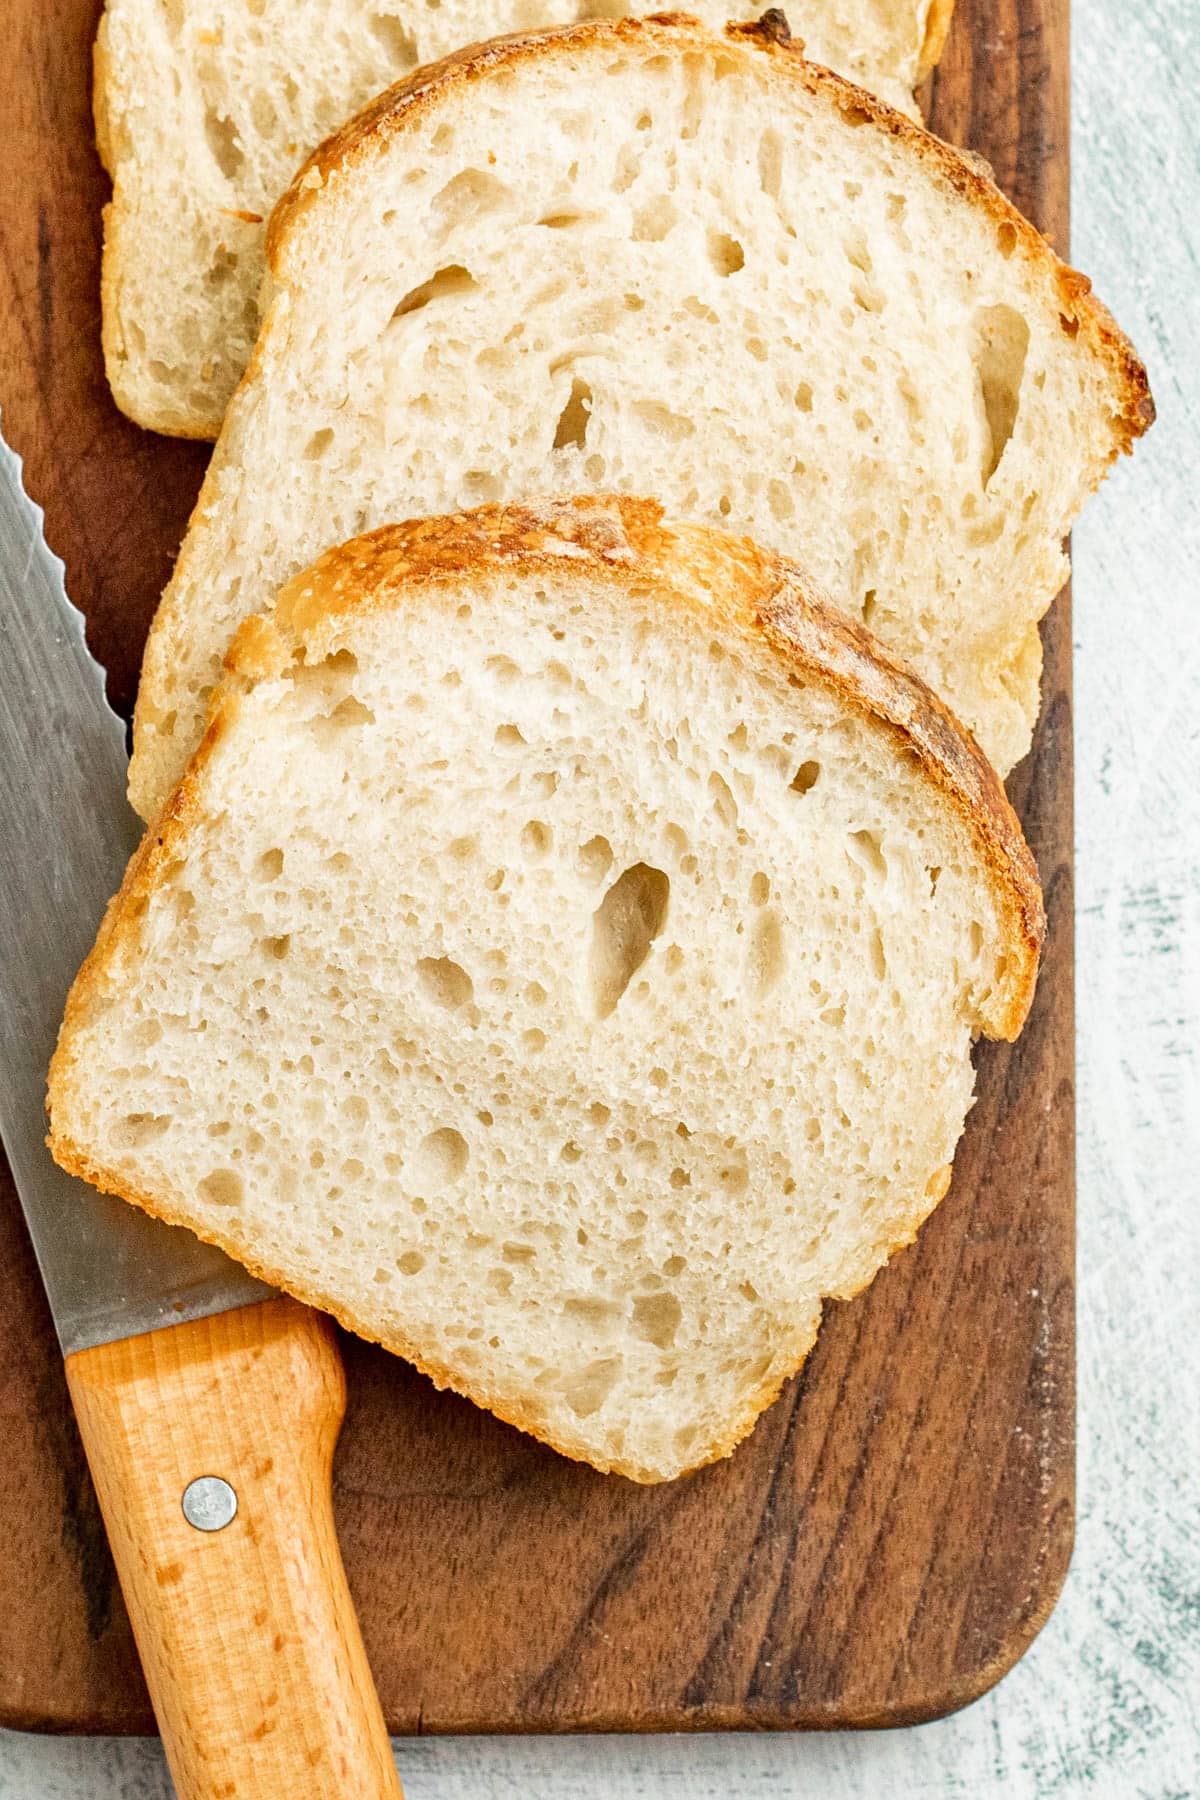
The crust of this loaf is thinner and softer than that of a Dutch oven loaf, making it much easier to slice. It’s a simple, everyday bread that works beautifully for toast, sandwiches, or straight up slathered with butter.
One reader, Tiffany, commented: "This was my first recipe with my new starter and it was fabulous. I doubled the recipe and did cut the time by 5 mins and this will definitely be my go to recipe. Thank you!!"
Another reader, Jane, said: "I’m new to sourdough, and this recipe has been wonderful! Easy to follow and tastes amazing."
This post may contain affiliate links. If you purchase through these links, we may earn a small commission, at no additional cost to you.
Jump to:
Ingredients To Make Sourdough In A Loaf Pan
Ingredient Notes
- Flour (All-Purpose): We actually use all-purpose flour for a lot of our sourdough recipes. It provides excellent structure for this sourdough in a loaf pan. Please note that ingredients in the recipe card are listed in grams (no U.S. cups) for accuracy and consistent hydration.
- Salt (Fine Sea Salt): We use fine sea salt for many of our sourdough recipes. Salt controls fermentation speed and strengthens gluten.
- Sourdough Starter: Provides the natural yeast and bacteria that ferment the dough and create a rise. You can use either an active, freshly fed starter or a levain built a few hours ahead. For more details, see our post on how to make a sourdough levain.
- Water: Hydrates the flour and activates gluten development while carrying the starter evenly through the dough.
Substitutions
- Flour (All-Purpose): You can use bread flour in the same amount for a slightly chewier texture.
- Salt (Fine Sea Salt): Table salt can be used in place of fine sea salt.
- Water: Bottled or filtered water can be used as a substitute for tap water.
Use the JUMP TO RECIPE button at the top, or scroll to the bottom of the post to see the printable recipe card with full ingredient measurements and complete instructions.
How To Make Sourdough In A Loaf Pan
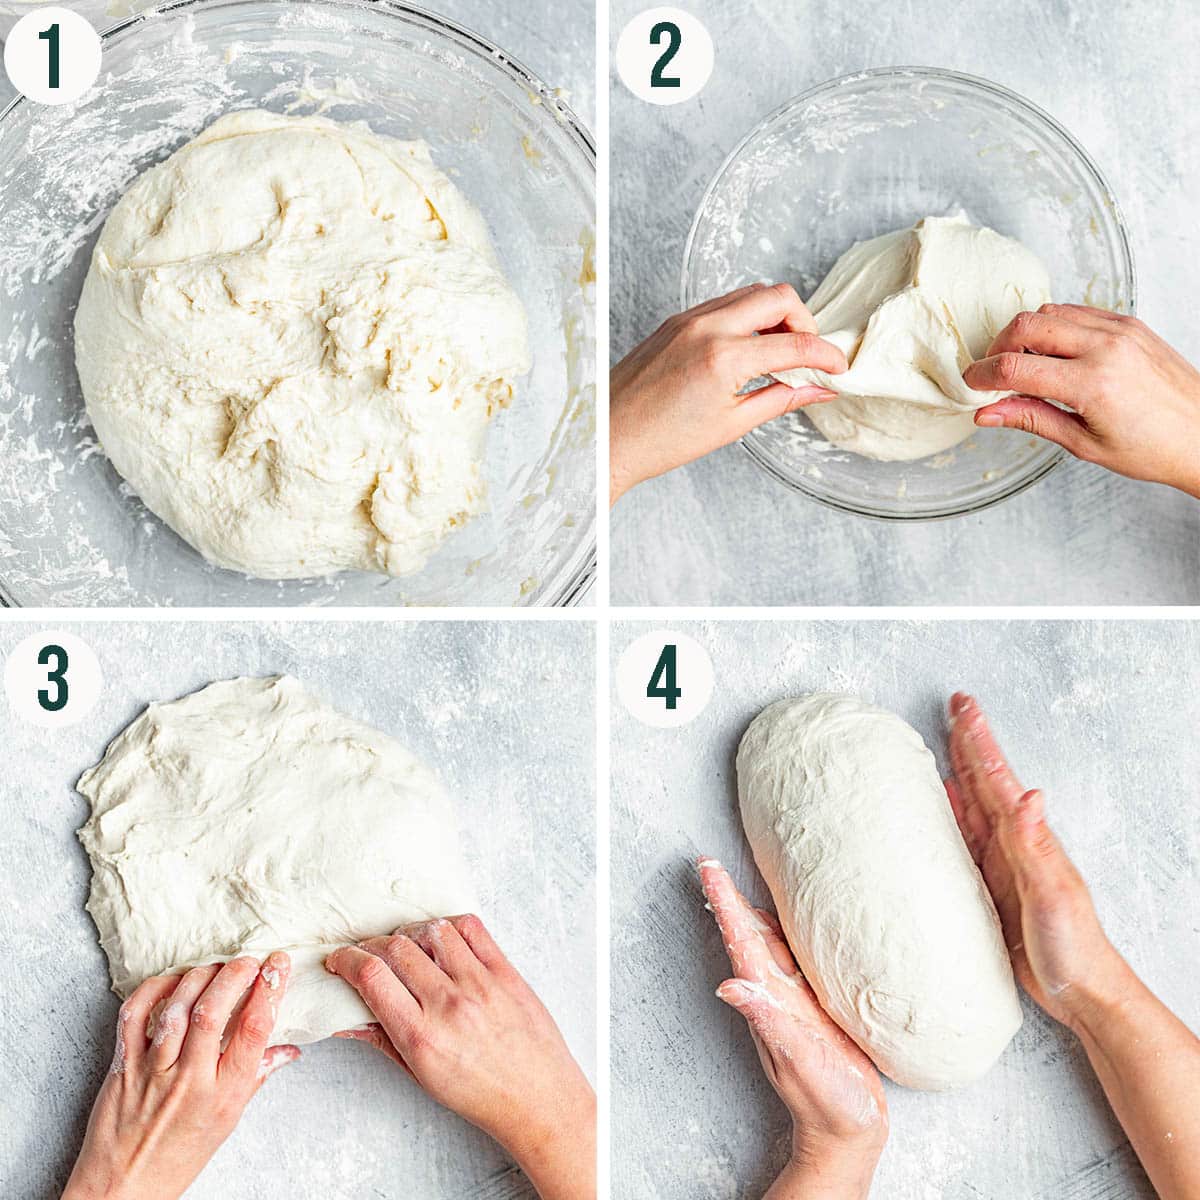
Step 1: Mix the starter and water in a large bowl. Stir in the flour until no dry bits remain. Cover and let the dough rest for 40 minutes. Add the salt, mix to incorporate, then cover the dough again and let it rest for 30 minutes.
Step 2: Over the next 3 hours, complete six rounds of stretches and folds, about every 30 minutes. Keep the dough covered between rounds.
Step 3: Shape the dough into a rectangle, then roll it into a log.
Step 4: Place the dough seam-side down and perform tension pulls on the counter to create surface tension.
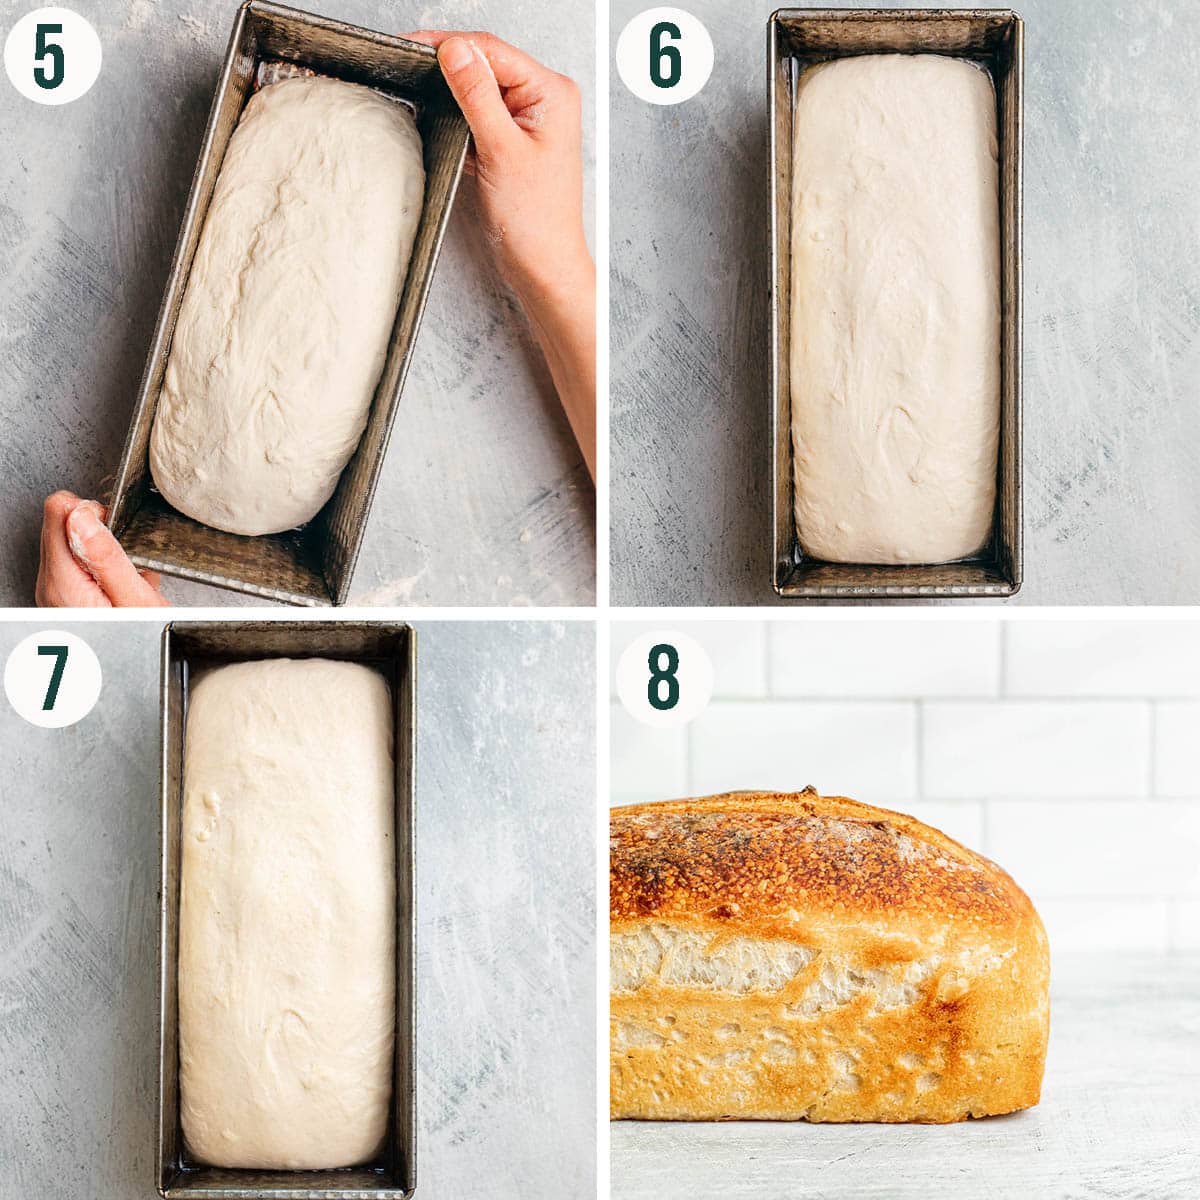
Step 5: Transfer the dough into a greased or parchment-lined loaf tin.
Step 6: Cover well and refrigerate the dough overnight.
Step 7: The next morning, take the dough out and let it rest at room temperature for 1 to 2 hours, until slightly puffy.
Step 8: Bake with a tray of water on the rack below the tin until the pan loaf is golden brown and sounds hollow when tapped. Cool before slicing.
Top Tips
- Use the water in the oven: Adding a pan of water to the oven during the first half of baking increases the humidity within the oven and helps improve the texture of the outer crust of the loaf. This is the same concept as baking in a Dutch oven.
- No need to score: Scoring isn't needed for sourdough in a loaf pan, but if you want to control where the bread will go as it rises during baking, you may prefer to score. If not, the loaf will usually open more on the side near the top rather than across the top.
- Using starter: If using active sourdough starter rather than levain, skip the step called Two Nights Before. This is the time needed for the levain to become active, the same as you would feed a starter one night before baking with it. For more information about what sourdough levain is and how to use it, visit our post called How To Make Sourdough Levain.
Recipe Notes
- We recommend using a standard loaf tin for this recipe, as the loaf isn't a particularly large one. That's 9 x 5 inches (23 x 13 cm). A longer tin can be used, but the bread may turn out relatively flat.
- You can make just about any sourdough in a loaf pan by following this method. If you don't have a Dutch oven, follow the same recipe as listed, then use the shaping and baking method described below.
- Let your loaf cool completely on a wire rack before cutting. Slicing it while warm can compress the crumb and make the texture gummy.
Storage For Sourdough In A Loaf Pan
- Storage: keep the bread in a fabric or paper bag, wrapped in a tea towel, or in a bread bin at room temperature for up to five days. It will dry out slightly over time, but toasts very well.
- Freezing: freeze the whole loaf in an airtight container, or do individual slices, for up to two months. Thaw slices directly in the toaster for easy single servings.
FAQ
Can you use a loaf tin for sourdough?
Any sourdough bread recipe can be baked in a loaf tin or bread pan. Follow the method here for your favourite recipe, or if you don't have a Dutch oven.
Do you need a special pan to bake sourdough bread?
While most recipes will call for a Dutch oven, a heavy-lidded pot, you can bake sourdough without a Dutch oven. Use a recipe specifically for a bread tin, or adjust any sourdough recipe to bake it this way.
Can you use metal with sourdough?
You can use stainless steel for sourdough, which most cutlery is made from these days. Any non-stick pans or other metals can react to the sourdough and cause the coating to flake off, for example. Bake your loaf in a stainless steel or glass pan for the best long-term care of your pan.
Recipes Related To Sourdough In A Loaf Pan
How To Bake Sourdough In A Loaf Pan
Equipment
- Mixing bowl
- Tea towel
- Loaf pan
- Baking tray with high sides
- Wire rack
Ingredients
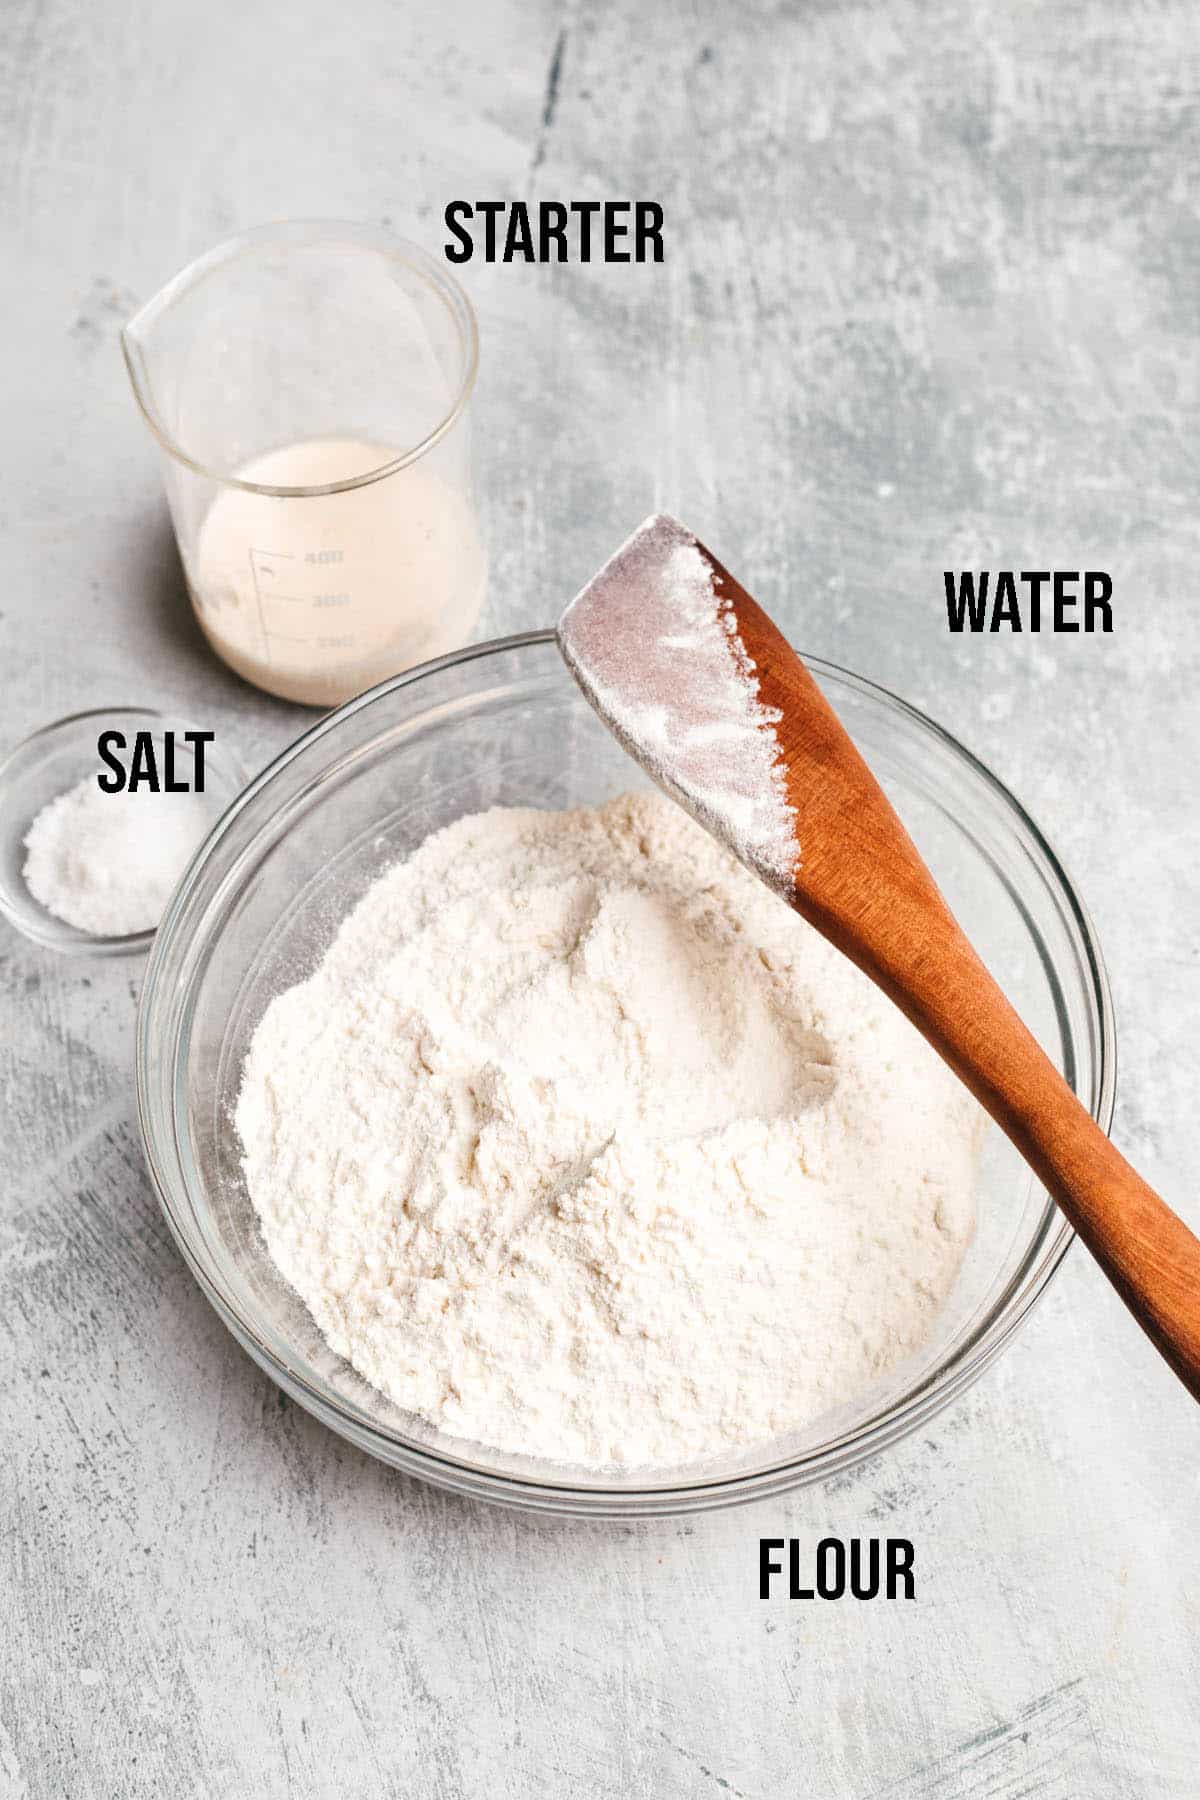
- 100 grams active starter, or levain
- 350 grams water, room temperature or 68°F/20°C
- 500 grams all-purpose white flour
- 10 grams sea salt
Instructions
- TWO NIGHTS BEFORE BAKING: Make The Levain
- Skip this step if you already have 100 grams of active starter ready. Take out 1 to 2 tablespoons of your starter from the refrigerator and mix with 50 grams of room temperature water and 50 grams of white flour. This will make 100 grams of levain.
- Cover the bowl with a plate and leave it on the counter to ferment overnight for approximately 8 to 12 hours.
ONE DAY BEFORE BAKING: Make The Dough
- Once your levain is ready, combine all of it with the 350 grams of water. Add the flour to the water mixture and, using your hands, mix to combine.100 grams active starter, 350 grams water
- Once the dough is mixed, cover with a tea towel and let it rest at room temperature for 40 minutes.
- After the dough has rested, add the salt. Mix well until combined then cover with the tea towel and let the mixture rest again for 30 minutes.10 grams sea salt
- After 30 minutes, it is time for the first fold.
Stretch & Fold The Dough
- Here’s a tutorial on stretching and folding. Complete six sets of stretch and folds, one set every 30 minutes, for 3 hours total.
Shape The Dough
- Begin by taking the dough out of the bowl and letting it rest on the counter for 20 minutes. Meanwhile, prepare your loaf pan by brushing it with a little neutral oil or melted butter.
- On a lightly floured surface, use your hands to flatten the dough into a rough rectangle. Roll it into a log, being sure to press out any air bubbles.
- Place the dough in the prepared pan. Cover it with a tea towel and refrigerate for 8 hours, or overnight.
BAKING DAY
- The next day, remove your dough from the fridge and let it rise on the counter for approximately 2 hours, or until it springs back when lightly touched with a floured finger. You can score the loaf if you desire, but it is not needed.
- While the dough is proofing, set one rack in the middle and one on the bottom of the oven. Preheat the oven to 500°F (260°C).
- Once the dough is proofed, reduce the oven temperature to 450°F (230°C) and place a 9x13-inch (23x33-cm) baking dish on the bottom rack. Fill it with about 2 cm (¾ inch) of water.
- Place the loaf tin on the middle rack and bake for 25 minutes. After 25 minutes, remove the tray of water, reduce the heat to 400°F (200°C) and bake the bread for another 20 minutes. Cover loosely with parchment or foil if it starts to brown too much.
- Remove the loaf from the oven and let it cool in the pan for 10 minutes before transferring it to a wire rack to cool completely.
Notes
-
- We recommend using a standard loaf tin for this recipe, as the loaf isn't a particularly large one. That's 9 x 5 inches (23 x 13 cm). A longer tin can be used, but the bread may turn out relatively flat.
- You can make just about any sourdough in a loaf pan by following this method. If you don't have a Dutch oven, follow the same recipe as listed, then use the shaping and baking method described below.
- Let your loaf cool completely on a wire rack before cutting. Slicing it while warm can compress the crumb and make the texture gummy.
- Storage: keep the bread in a fabric or paper bag, wrapped in a tea towel, or in a bread bin at room temperature for up to five days. It will dry out slightly over time, but toasts very well.
- Freezing: freeze the whole loaf in an airtight container, or do individual slices, for up to two months. Thaw slices directly in the toaster for easy single servings.
Nutrition
Nutrition information is an estimate and is provided as a courtesy. For precise nutritional data, please calculate it independently using your preferred nutrition calculator.
This post may contain affiliate links. If you purchase through these links, we may earn a small commission, at no additional cost to you.
 Did you make this recipe?Please consider leaving us a rating and a comment. It helps others find our work, which genuinely supports what we do. Thank you!
So pleased, used starter that had been fed every day for a week, made levain, followed instructions, my pan was an inch short so I put some dough in a second pan. 1and a half loaves!
Do I need to change the temp or baking time with a Pullman loaf pan with lid?
Hi Cassandra, You won’t need the baking dish of water when using a Pullman pan because the lid should keep any steam inside the pan, but I would still remove the lid as written in the recipe to brown the top of the loaf at the end. That being said, I think you could leave the lid on for the whole bake if you like a paler, soft loaf. Thanks for your question! Kelly.
Thank you! My loaf came out lovely!
thank you so much for this recipe!! the first one I tried used sugar and I just did it without thinking. bad idea! but yours turned out perfect, now my son and I have perfect sourdough!!!
I noticed the recipe doesn’t say to cover the loaf for the beginning of the baking process… is that correct or did I miss something? Ty!!
Great question Hayley, and no you didn’t miss anything. For this loaf-pan version, there’s no need to cover the dough during the first part of baking. The tray of water on the bottom rack creates steam in the oven, which keeps the crust soft long enough for the loaf to rise before it sets, just like a covered Dutch oven would.
Love this recipe and it turns out amazing every time! Wondering if you could use whole wheat flour though and how would that change the recipe?
Thanks!
Hi Sierra, we make this with 50% whole wheat flour most of the time with no changes to the recipe - you might want to add an extra splash of water depending on your flour. We haven't tried this recipe with 100% whole wheat but think it would work well.
Excellent recipe for sourdough!
Hi! I noticed in the recipe it doesn’t mention a bulk fermentation process?
Does that still need to happen after the 6 stretch & folds?
Or after the stretch and folds I can just go straight to the 20min rest on the counter?
A current recipe I’m using is a 4 stretch and fold and then a bulk fermentation for about 2/3hours. And then I rest, and then shape.
Hi Mandi, the recipe is correct as written, using a method Sophie learned when working in sourdough bakeries at the start of her career. You'll see in a lot of our sourdough recipes that we skip a traditional bulk ferment and the dough goes right into the fridge after the stretches and folds.
I took the dough out of the fridge 4 hours ago. Still waiting? It’s about 2/3 high in the pan. Keep waiting or is it not any good?
Hi Dorothy, you can do the poke test to see how it's doing (see if it slowly rises again after poking with your finger). As with any sourdough, you shouldn't toss it if it isn't rising as quickly as you expect - it might just be cold in your kitchen and the dough needs a little extra time to rise before baking. Try the poke test first!
This was first proper (yeast free) sourdough loaf. Loved it! Thanks for the easy to follow recipe 🙂
What size pan should I use?
Hi Miranda, We recommend using a standard loaf tin for this recipe. That's either 8.5 x 4.5 x 2.5 inches (21.5 x 11.5 x 6.5 cm) or 9 x 5 x 3 inches (23 x 13 x 7.5 cm).
This was my first recipe with my new starter and it was fabulous. I doubled the recipe and did cut the time by 5 mins and this will definitely be my go to recipe. Thank you!!
Love this bread! Better/easier the second time I made it. The only issue is this top is browning too quickly.
Hi Tina, glad you like the recipe. To reduce browning on the top you can lightly cover in tinfoil when you see it's browning too much, or try baking it on a lower rack in the oven.
Would this recipe work okay with inclusions? For example rosemary and Parmesan? Or confit garlic and herbs? Would I need to adjust anything?
Hi Jen, should be fine with inclusions. We recommend adding them in just before shaping.
Hi. What would the directions be for proofing it on the counter rather than cold proofing overnight?
Hi Anne, you'd have to do a much shorter proving time and it would really depend on temperature in your home. We think 4-6 hours at room temp but it'll vary based on temperature, strength of starter, and more, so you'll have to keep an eye on it.
Can the dough sit in the fridge longer than 8 hours? What is the max time it can be refrigerated?
Hi Ashley, you can probably stretch it to 24 hours but make sure it's tightly covered so that it doesn't dry out on top.
I see in the ingredients list that it calls for 100 grams of starter. I see where the first 50 is used but I don't see where the rest comes in. I'm not sure why I'm missing it.
Hi Sandra, the instructions tell you how to make a levain as the first step. If you're using active starter, it's 100 grams (otherwise, you make 100 grams levain instead). Either way it will be 100 grams 100% hydration active starter.
Can this be done in a glass loaf pan?
Hi Brianna, it should be fine, as long as it's one that's safe for high heat.
Can this recipe be doubled for 2 loaves?
Yes, double all the ingredients and split before shaping into two loaves.
Has anyone ever tried soaking the loaf pan in water before baking?
Hi Tricia, are you thinking that this could help with steam? The recipe calls for a tray of water to be added into the oven, which should do the job. Are you cooking in a clay baker or something that is porous?