Making sourdough starter is as easy as stirring together flour and water! Here we'll show you how to make starter from scratch. Sourdough starter is a homemade fermented culture used in place of commercial yeast to bake sourdough bread and other delicious foods like bagels, pizza crust, hot cross buns, and more! Starter is created when wild yeast, captured from the environment, is given time to ferment and reproduce. In this case, wild yeast ferments in a simple mixture of flour and water.
Wild yeast is found everywhere. When equal parts of flour and water are mixed together, wild yeast digests the mixture, and produces carbon dioxide. The carbon dioxide creates bubbles, which gives sourdough bread its signature airy crumb, as well as alcohol, which gives sourdough bread its sour flavour.
Jump to:
Important Terminology
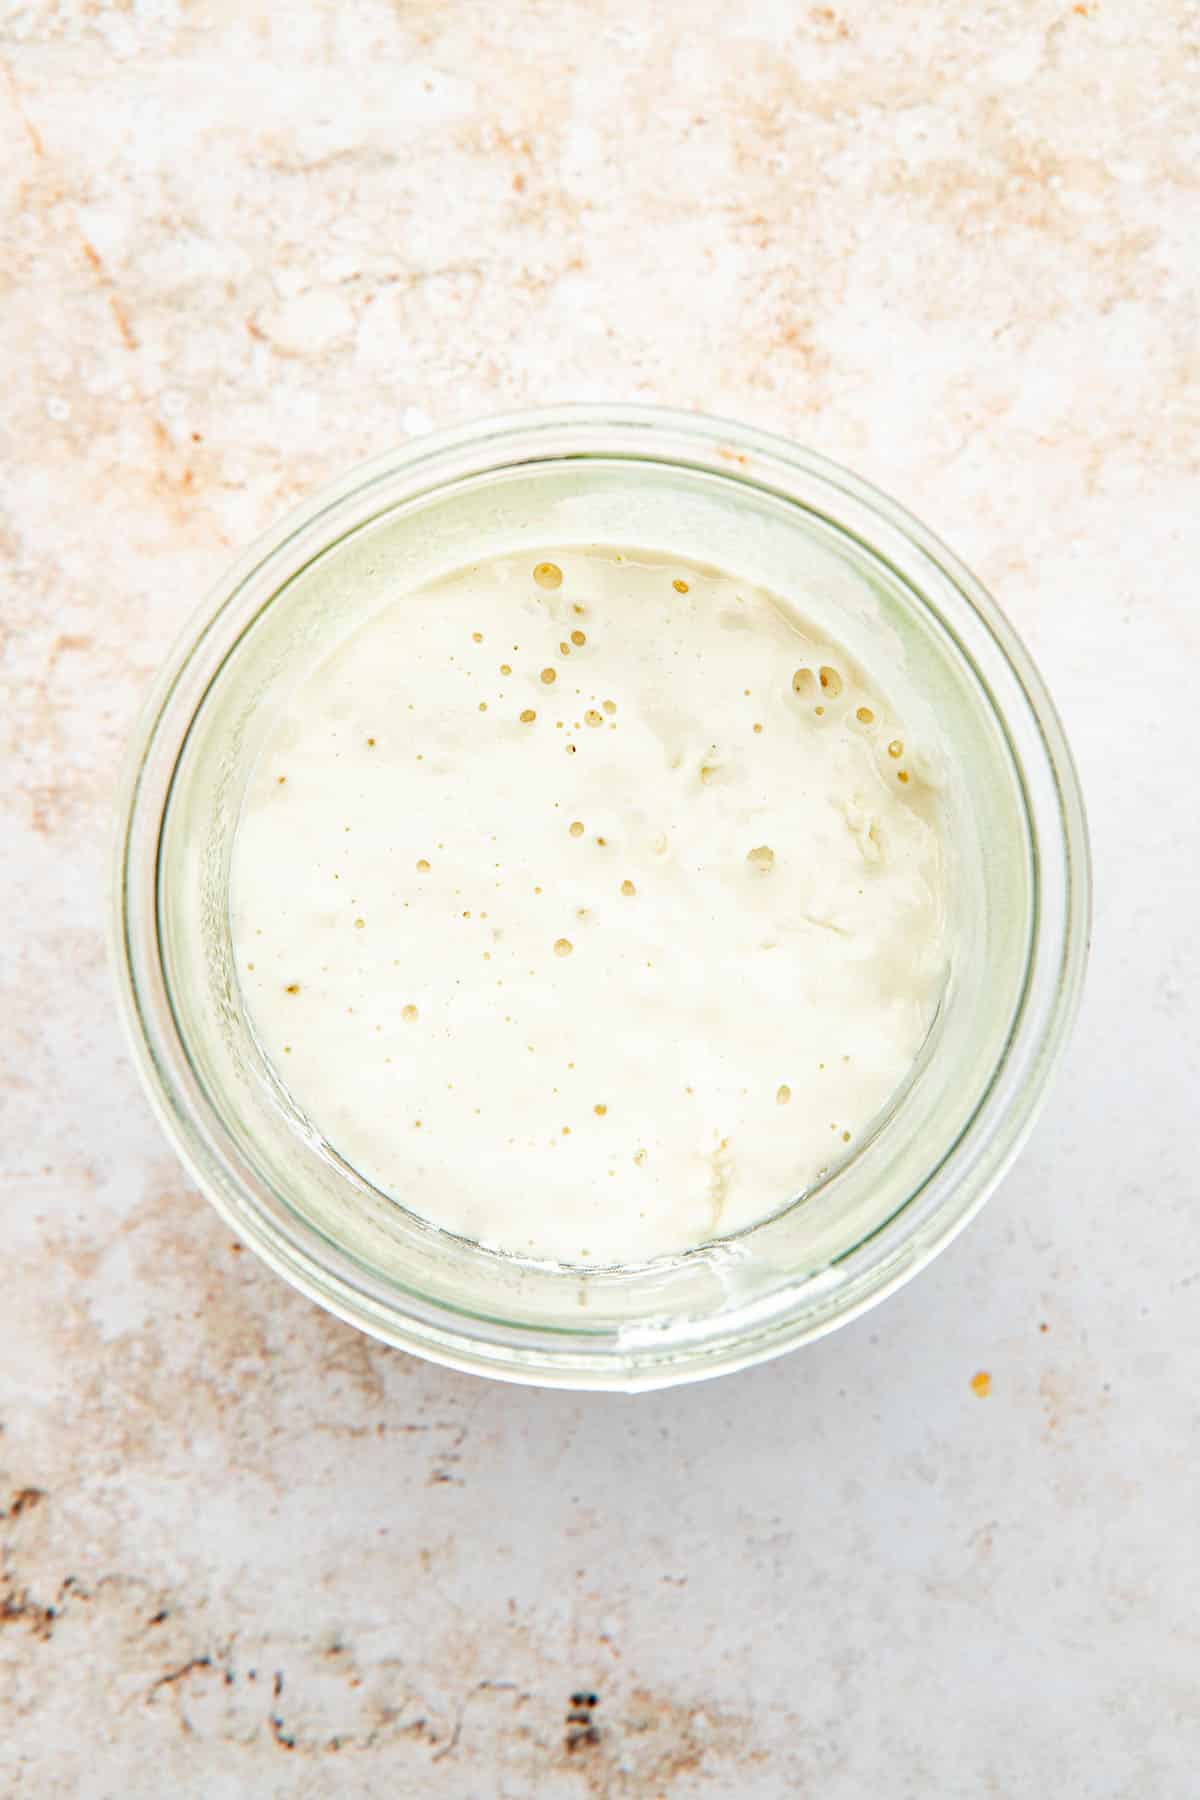
- Active: when sourdough starter is light, fluffy, bubbly, and looks like thick sticky melted marshmallow when stirred it is active, which means ready to bake with. Some recipes specifically call for active starter.
- Discard: if you continue feeding sourdough starter fresh flour and water, without throwing any away, your jar will overflow in less than a week. Some bakers pour extra starter, also called discard, into the organics bin almost daily. Others save their discard for making recipes like sourdough pancakes, muffins, and tortillas. What you do with your discard depends on your own personal baking agenda.
- Feed: when people talk about feeding sourdough starter, they simply mean adding equal parts fresh flour and water to the jar of starter. This refreshes the starter and gives the carbon dioxide in it something to "feed" on.
- Float Test: this method can be hit or miss for bakers, however some swear by it. Drop a small bit of sourdough starter into a glass of water. If the starter floats to the top, it’s ready to use. This is called the float test.
- Hooch: if you forget to feed your starter for a few days, you may notice a layer of grey liquid develop on top of the starter. This is the alcohol produced by the carbon dioxide when it is "hungry". It's just a sign your starter needs fresh flour and water. Some people stir the hooch back into their starter while others pour it off into the organics bin. It's really up to you. Always remember—grey liquid is fine. Discolouration, pink formations, or mold is not. If you see any pink spots, patches of discolouration, or mold, throw your starter away and start over.
- Hungry: if your starter has lost its bubbles, or you see hooch forming on top (see above) it means the carbon dioxide in the starter is hungry and needs fresh flour and water to stay alive. This is why some people name their starters! The process is often compared to taking care of a pet.
- Hydration: this refers to the ratio of flour to water. The method in this post is 100% hydration, meaning the flour is hydrated with an equal amount of water. Some bakers use different hydration ratios for their starters. Hydration also refers to the ratio of flour and water present in loaves of sourdough bread, and can also vary from recipe to recipe.
- Kahm Yeast: if you neglect your starter, it may form a cloudy white layer on top of the hooch. This growth is called kahm yeast and can be found in other ferments such as kombucha and kefir. Kahm yeast is not the same thing as mold! In fact, kahm yeast is not harmful to consume, but it can add an unpleasant cheesy flavour to your starter. If you find kahm yeast in your jar you can either toss the starter and start over, or scrape the cloudy layer off completely. Then, spoon about 25 grams of the untouched starter from below the kahm yeast into a clean jar, and continue to feed as usual.
- Unfed Starter: this is the opposite of active starter, and is also called discard. Some sourdough recipes will specifically call for unfed starter.
Recommended Tools
- Digital Kitchen Scale: there's really no way around this as sourdough requires exact measurements in order to work. A scale will make all of your bakes consistent and remove any guess work.
- Flour: strong bread flour is a great option for making sourdough starter, but it isn't always available. In this case, regular white all-purpose flour can yield great results. You can also use 100% of, or a percentage of, spelt, whole wheat, or rye flour(s) mixed with all-purpose or bread flour.
- Glass jar with a lid: glass is a terrific option for starter, but plastic containers also work. You basically need a tall vessel with a wide mouth. You can use the lid of your vessel when storing starter, or you can use a small piece of plastic wrap secured around the top with a rubber band. Some people use a square of clean fabric secured with a rubber band around the top of the jar, but note that this can cause the surface of the starter to dry out a bit.
- Water: some bakers are insistent on using unfiltered water. We've had great results with lukewarm tap water.
How to Make Sourdough Starter
Day 1
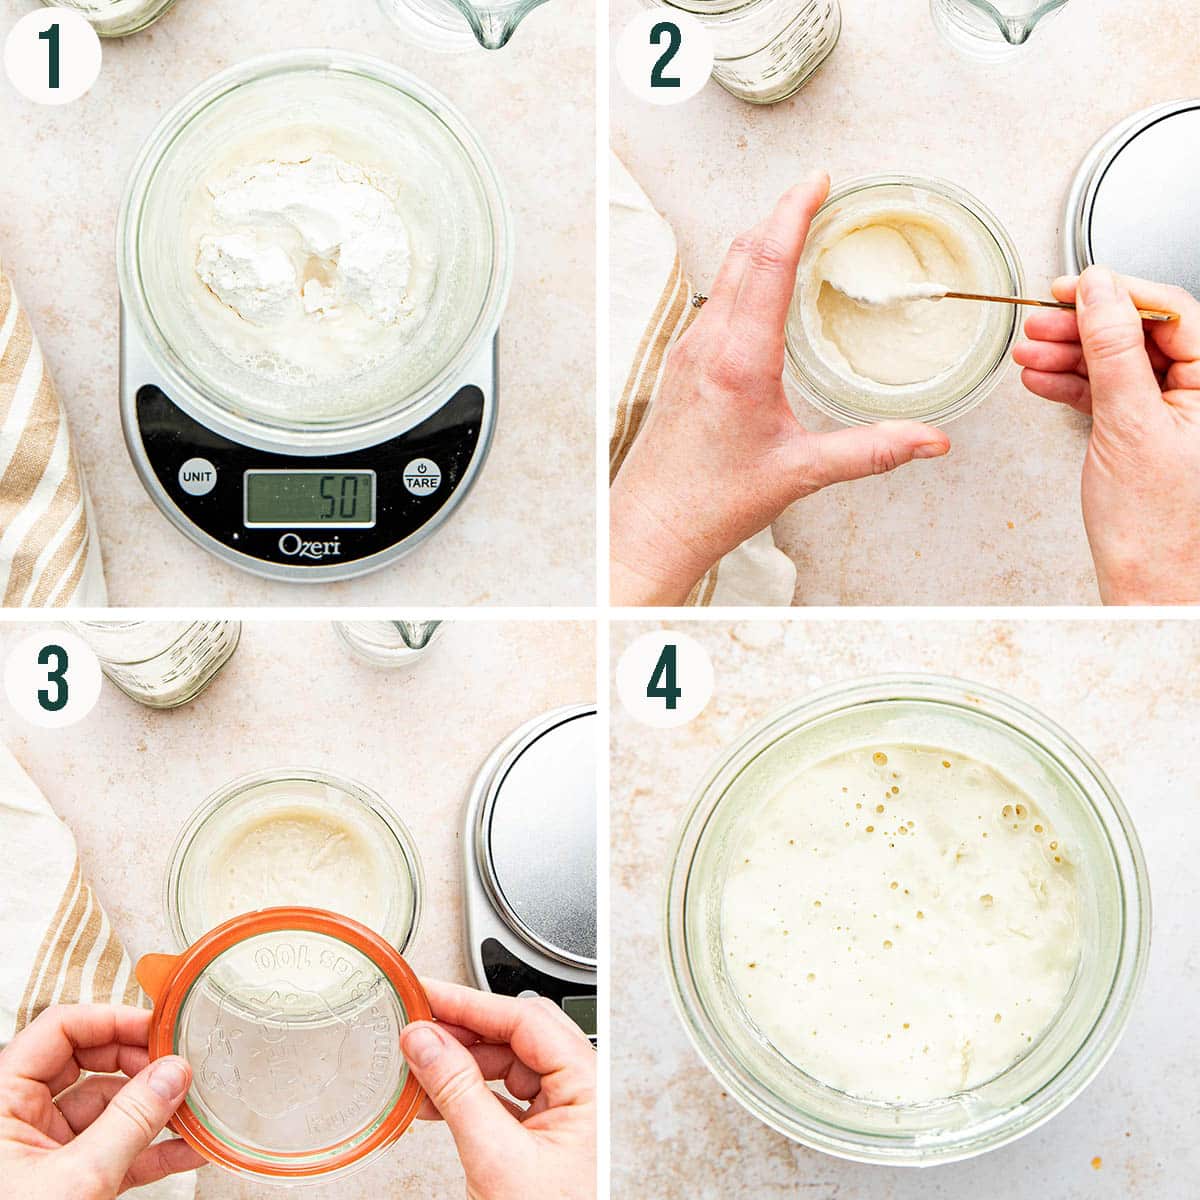
- 50 grams all-purpose flour and 50 grams room temperature or lukewarm water
- Combine the flour and water in a large glass jar and stir to form a thick paste. Cover with the lid of the jar, or a piece of plastic wrap secured around the top with a rubber band.
- Place your sourdough starter in a spot where temperature will remain consistently draft-free and warm. Be sure to choose a spot where you will see the jar on a daily basis and remember to feed it.
- Optional: place a rubber band around the jar lined up with the top of the starter to measure growth day-by-day.
Day 2
- 50 grams all-purpose flour and 50 grams room temperature or lukewarm water
- You may see a few tiny bubbles starting to form on the surface of your starter. If so, that’s great! If not, don't worry, it’s still very early. It can take over a week to see anything happen. Mix the fresh flour and water into your starter and stir vigorously until a thick, smooth, sticky batter forms.
- Cover the jar and return your starter to the spot you kept it the previous day.
Day 3
- 50 grams all-purpose flour and 50 grams room temperature or lukewarm water
- Hopefully by now the surface of your starter is dotted with small bubbles and is slightly larger in volume. It may have the beginnings of a faint sour/musty smell. If it is still flat and hasn't grown do not worry!
- Pour half of your starter into the organics bin. Add the fresh flour and water to the jar and stir vigorously to combine. The mixture will be thick and pasty.
- Cover and return your starter to its spot.
Day 4
- 50 grams all-purpose flour and 50 grams room temperature or lukewarm water
- At this point your starter may be bubbly and doubled in size (this is where a glass jar comes in really handy to be able to see). It should also smell somewhat sour, but not astringent.
- Pour half of your starter into the organics bin. Add the fresh flour and water and stir vigorously to combine. The mixture will be thick and pasty.
- Cover and return your starter to its spot.
Day 5 And Onward
This far along, your starter should be bubbly (with bubbles both on top of and throughout the starter) and doubled in volume. It will smell faintly sour, but still pleasant. As time goes, and your starter matures, the sourness will increase in both smell and flavour.
If your starter doesn't show these characteristics yet, don’t worry. Depending on your kitchen temperature, flour quality, and any other number of reasons, your starter might take a bit more coaxing to become active.
Continue the process of discarding half of your starter and feeding it equal amounts of fresh flour and water every one to three days indefinitely.
How To Store Sourdough Starter
To Store At Room Temperature: if you bake often, you may want to keep your starter on the counter in your kitchen or another warm, draft-free spot of your choosing. If you choose to keep your starter out at room temperature, you will have to feed it fresh flour and water every 1 to 3 days.
To Store In The Fridge: once your starter is showing plenty of bubbles throughout, place the sealed jar in the fridge. As time goes on, and you use your starter, the jar contents will deplete. Remove the almost-empty jar from the fridge and refresh with equal parts flour and water. Mix until smooth, cover, and allow the starter to sit at room temperature for a few hours. After a few hours the starter should be bubbly. If not, feed the starter every 8 hours until the bubbles return then store the jar to the fridge.
How To Bake With Refrigerated Starter
Refresh The Whole Jar: remove the jar from the fridge two days before you want to bake. Feed it fresh flour and water every 12 hours until you reach the the look, smell, and consistency described in day five.
Make A Levain: think of levain as making small batches of active sourdough starter to order! The important thing to note is you have to make levain the night before you start your recipe. Simply take a tablespoon of cold starter from the fridge and mix it with enough flour and water to yield the full amount of starter your recipe requires. For more information, we have a whole post called How To Make Sourdough Levain.
Top Tips
- Don't get discouraged: it can sometimes take more than two weeks to coax life out of sourdough starter!
- Buy a digital kitchen scale that weighs in grams: sorry, but you really do need one to bake consistent sourdough. Even a few grams of extra water can throw off a whole recipe!
- Have fun: don't take baking sourdough too seriously (unless you plan on baking it for a living). The entire process is almost meditative, and is a great hobby to learn but it doesn't take time. Enjoy the journey to baking your first perfect loaf!
FAQ
Where do you buy flour for sourdough?
Most flours will work for baking sourdough with a little practice. We buy flour from the grocery stores, bulk stores, and sometimes order from small artisanal millers in Canada like Flourist.
My starter had bubbles the first week, but now they're gone. Is it dead?
Sourdough starter is very good at tricking us into thinking we'll be sourdough experts that the first week (wow, look at all those bubbles)! If around the one week mark your sourdough has as much life as a popped balloon, don't worry. Just be patient, and continue to feed daily. It WILL come back to life! It can take up to a month depending on how cold your house is.
How do you know when sourdough starter is ready to use?
When you stir your starter, it should have a spongy, pillowy texture. This can take anywhere from a few days day to a few weeks. Thick, sticky, stringy, and bubbly is what you're looking for. These are the signs of active starter, ready for baking.
How much starter do I need for bread?
One cup of active bubbly starter weighs 200 grams. The amount of starter you need is dependent on the recipe you choose. If you choose to make a recipe requiring more starter, simply leave the discard in the jar rather than throw it away, and feed fresh flour and water as per usual.
Do you only use the top bubbly part of starter?
If your starter is showing strong bubbles on the surface, chances are the bubbles go all the way through to the bottom of the jar. Give it a stir and look for a consistency of melted marshmallows, which is the texture of active starter ready for baking.

If you make this Sourdough Starter recipe or any other sourdough recipes on the Baked Collective, please take a moment to rate the recipe and leave a comment below. It’s such a help to others who want to try the recipe. For more baking, follow along on Instagram, TikTok, and YouTube.
How To Make Sourdough Starter From Scratch
Equipment
- Jar
- Spoon
Ingredients
- 50 grams all-purpose flour, plus extra for daily feeding
- 50 grams warm water, plus extra for daily feeding
Instructions
Day 1
- Combine 50 grams flour and 50 grams warm water in a large glass jar and stir to form a thick paste. Cover with the lid of the jar, or a piece of plastic wrap secured around the top with a rubber band. Place your sourdough starter in a spot where temperature will remain consistently draft-free and warm. Be sure to choose a spot where you will see the jar on a daily basis and remember to feed it. Optional - Place a rubber band around the jar lined up with the top of the starter to measure growth day-by-day.
Day 2
- You may see a few tiny bubbles starting to form on the surface of your starter. If so, that’s great! If not, don't worry, it’s still very early. It can take over a week to see anything happen! Mix 50 grams fresh flour and 50 grams warm water into your starter and stir vigorously until a thick, smooth, sticky batter forms. Return your starter to the spot you kept it the previous day.
Day 3
- Hopefully by now the surface of your starter is dotted with small bubbles and is slightly larger in volume. It may have the beginnings of a faint sour/musty smell. Pour half of your starter into the organics bin. Add 50 grams fresh flour and 50 grams warm water and stir vigorously to combine. The mixture will be thick and pasty. Cover and return your starter to its spot.
Day 4
- At this point your starter should be bubbly and doubled in size (this is where a glass jar comes in really handy to be able to see). It should also smell somewhat sour, but not astringent. Pour half of your starter into the organics bin. Add 50 grams fresh flour and 50 grams warm water and stir vigorously to combine. The mixture will be thick and pasty. Cover and return your starter to its spot.
Day 5 And Onward
- This far along, your starter should be bubbly (both with bubbles on top of and throughout the starter) and doubled in volume. It will smell sour, but still pleasant. If your starter doesn't show these characteristics yet, don’t worry. Depending on your kitchen temperature, flour quality, and any other number of reasons, your starter might take a bit more coaxing to become active. Continue the process of discarding half of your starter and feeding it 50 grams fresh flour and water every one to three days indefinitely.
Nutrition
Nutrition information is an estimate and is provided as a courtesy. For precise nutritional data, please calculate it independently using your preferred nutrition calculator.
This post may contain affiliate links. If you purchase through these links, we may earn a small commission, at no additional cost to you.
 Did you make this recipe?Please consider leaving us a rating and a comment. It helps others find our work, which genuinely supports what we do. Thank you!