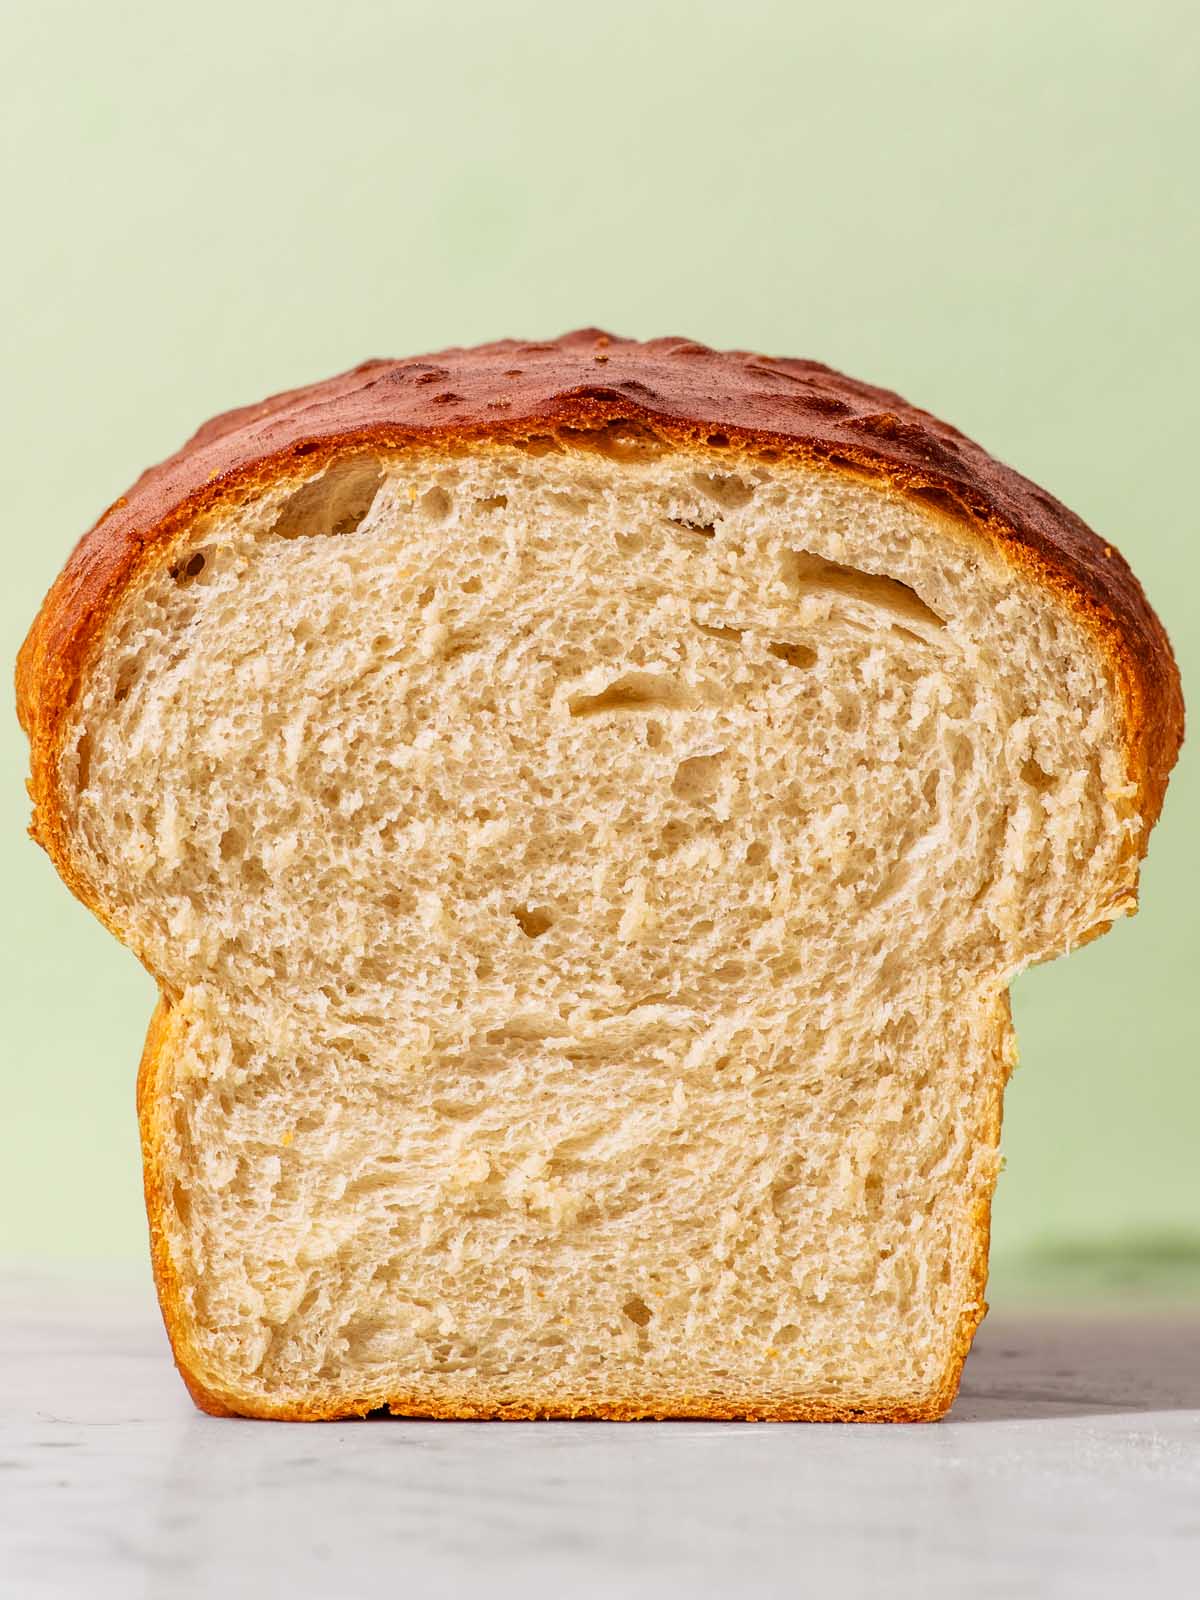
Extraordinarily soft, light, and fluffy, this sourdough discard sandwich bread is like a cloud. This is a faster way to use your starter to bake a loaf, ready in a few hours from start to finish, with no overnight rise.

This post may contain affiliate links. If you purchase through these links, we may earn a small commission, at no additional cost to you.
Recipe Rundown: Sourdough Discard Sandwich Bread
Prep Time
20 minutes
Bake Time
40 minutes
Rise Time
1 hour 45 minutes
Servings
1 loaf (12 slices)
Difficulty
Intermediate
Calories
171 kcal*
Primary Ingredients
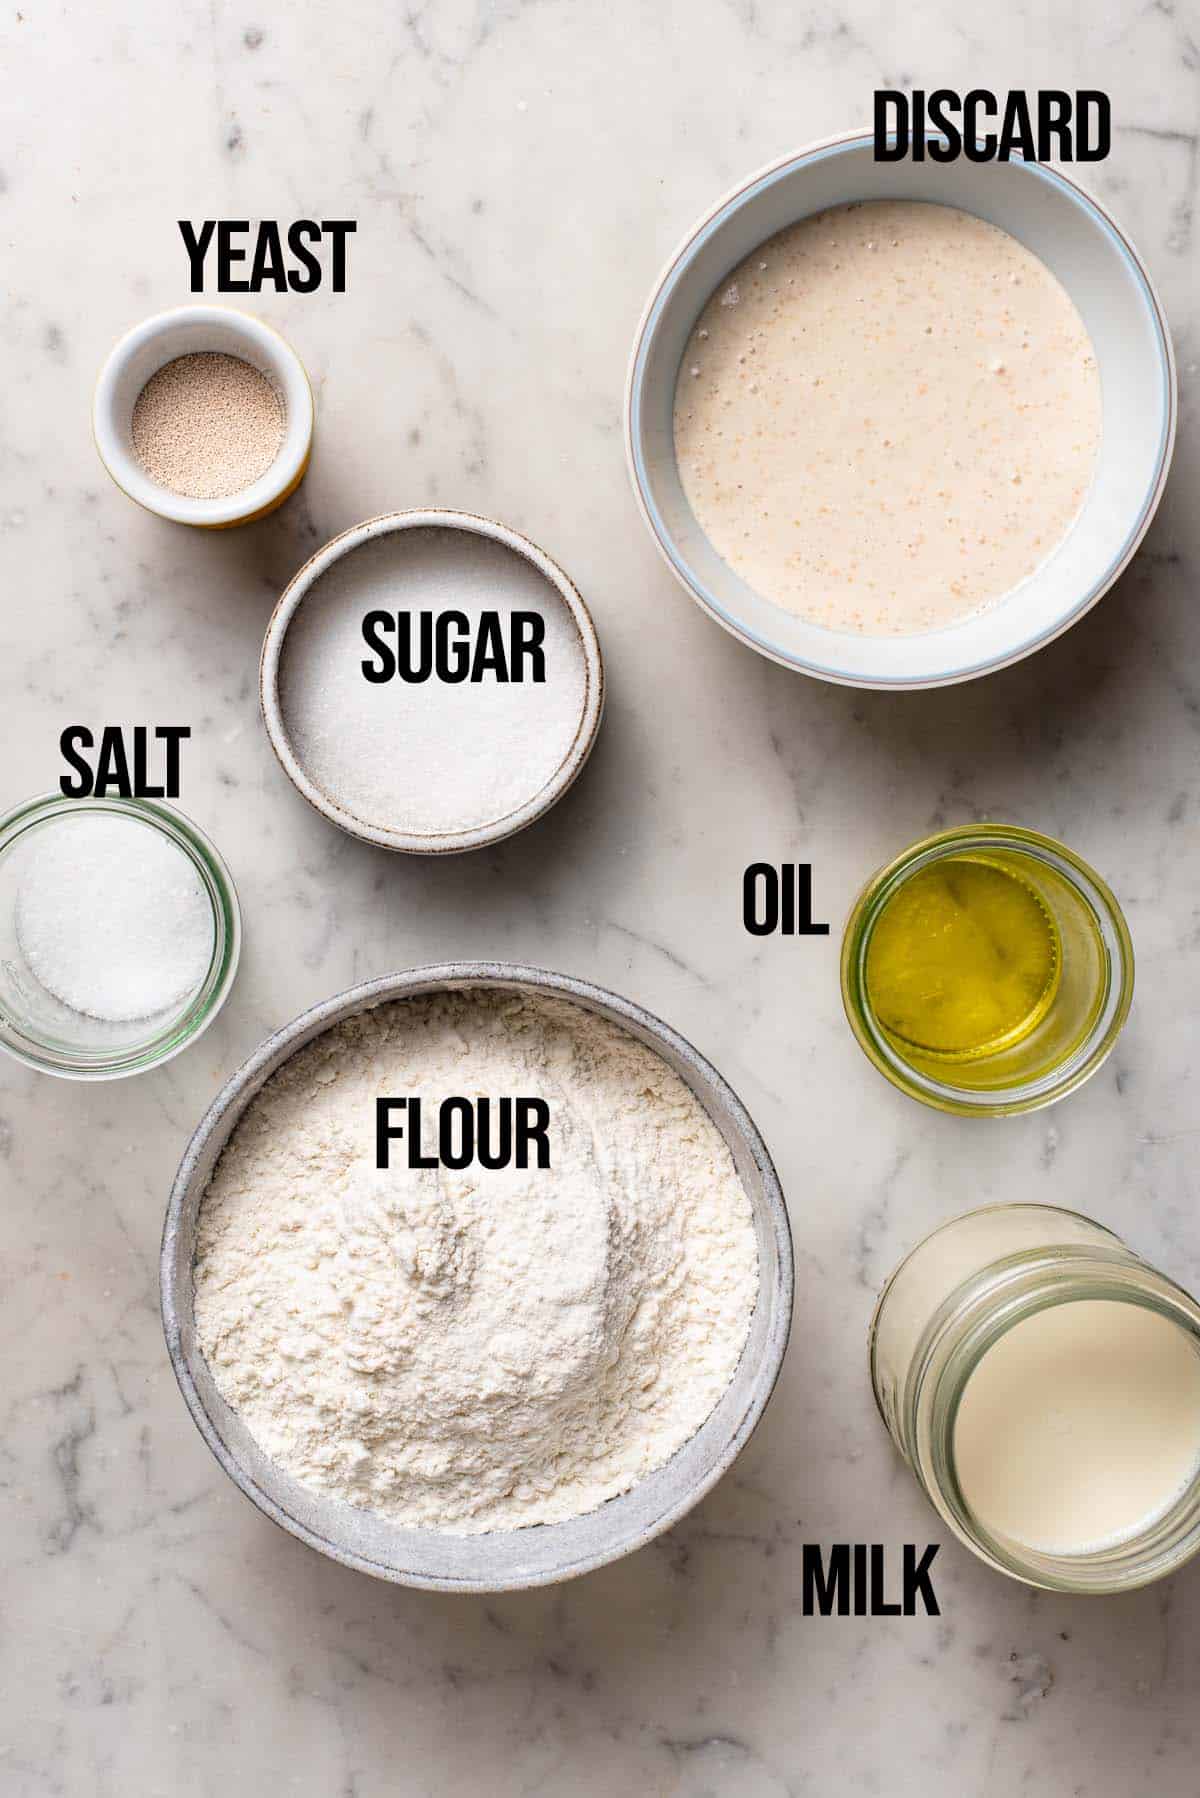
Sourdough discard, yeast, all-purpose flour, milk, olive oil, sugar, and salt.
*Calories are an estimation.
How This Recipe Works

Instead of using only sourdough starter, you're using discard for this recipe - the old starter that would otherwise be thrown away when you're continuously feeding a jar of sourdough starter - in addition to yeast. The yeast provides most of the lift and the discard adds flavour.
It means that you get an extremely soft, fluffy loaf of bread that still has some sourdough tang and it's a good way to use up discard. If you're a sourdough beginner it's also a great way to use up weak starter when you first start a new one and it's not yet strong enough to bake sourdough loaves. If you prefer to use your starter without yeast, try our sourdough sandwich bread instead.
I developed and tested this recipe, adapted from Paul Hollywood Bake. Some differences from the original recipe are replacing water with milk and adding a little sugar - plus the discard, of course - for a softer, lighter loaf.

Ingredients You'll Need and Why
We're using ingredients that are pretty standard in a sandwich bread, with milk, sugar, and oil enriching the dough to make it softer and discard to add some sourdough flavour. These are our notes from recipe testing and you can find the full recipe card below with complete measurements and instructions.
- Flour: use plain all-purpose flour for this bread. Some of the flour can be replaced with bread flour if you like a slightly chewier bread but it's not necessary. You could use up to 50% whole wheat flour but note that the bread won't be nearly as light with whole wheat.
- Yeast: you'll need instant yeast or fresh yeast for this recipe, because it isn't bloomed first. If you can only get traditional or active yeast (or you're not sure what it is) then mix with the milk first and set it aside for 10 minutes before adding the remaining ingredients.
- Discard: leftover sourdough starter from feeding your starter, or old starter that's been sitting in the fridge. Try to use discard that's less than 2 weeks old to prevent a very strong, potentially unpleasant taste in the bread. Active sourdough starter can be used too but definitely measure by weight.
- Milk: use whole dairy milk (around 3.25% fat) or soy milk for a non-dairy version. I've tested with both and found that soy gave a similar structure in the loaf (it has a similar protein profile, which contributes to gluten development in bread).
- Sugar: you could probably substitute honey or another sweetener but this has only been tested with white sugar and raw cane sugar.
- Oil: I haven't tested this recipe with butter and would recommend using melted and cooled butter if that's what you want to use. The proving time might be a little longer with butter rather than oil.
Use the JUMP TO RECIPE button at the top, or scroll to the bottom of the post to see the printable recipe card with full ingredient measurements and complete instructions.
How to Make Sourdough Discard Sandwich Bread
The method is an excellent simple one: mix all the ingredients together, knead until the gluten is developed, rise, shape, rise, and bake. No stretches and folds, no timer needed every half hour - it's very similar to a standard loaf of bread with a short rise time.

Step 1: mix all of the ingredients together in a large mixing bowl, using a stand mixer if you have one, until combined. It doesn't need to be perfectly mixed because you're about to knead the dough anyway.
Step 2: knead the dough until soft, smooth, and strong, about 15 minutes. The dough should pass a windowpane test once it's ready. Don't add any more flour when kneading. If you're kneading by hand and the dough feels sticky, just keep going, and eventually the dough will come together once the gluten is strong enough.
Step 3: set the dough aside to rise, covered, until doubled in size. This should take about an hour but go by the dough, not by the clock, and make sure it has doubled. It can take longer if your home is very cold (and also the reverse, if it's hot).
Step 4: roll the dough into a log the length of your bread tin and place it into a well-greased tin. Use butter or a solid oil for this. Butter is best in terms of flavour.
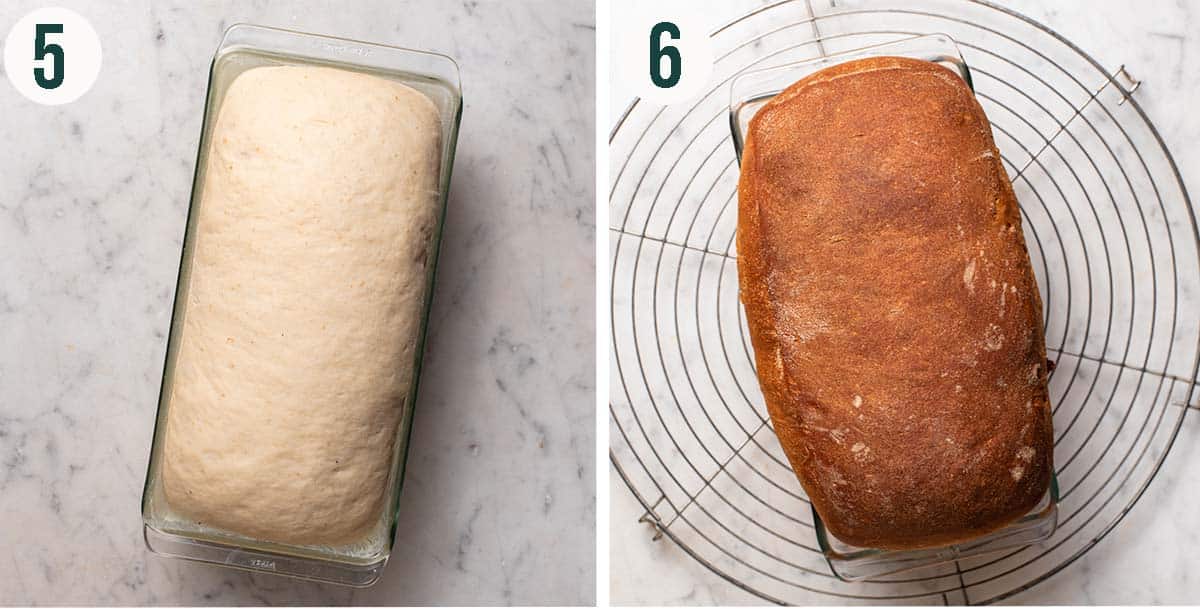
Step 5: let the dough rise again until it crowns the bread tin. We tested in a standard 26cm (10 in.) long container and if you're using the same size, the dough should crown 2.5cm (~1 in.) above the edge when it's ready. Otherwise you can do a poke test if you're not sure.
Step 6: bake the bread for about 35 minutes - timing will vary slightly depending on the material of the bread tin - and cover the top with foil if it's browning too much. Brush with butter while the loaf is still hot and cool before slicing.
Expert Tips for the Best Loaf
- Cut with a sharp knife: the bread is so soft that a dull knife can tear the interior of the loaf rather than slicing through.
- Don't skip the extra butter: brushing the top with butter (or even something like coconut oil) makes a real difference in how soft the bread is, improves the flavour of the crust, and it look just a little bit nicer.
- Expect a strong rise: the bread will rise a lot in the oven, probably more than you expect, and is a very tall loaf. I haven't tried making it in a pullman-style pan (pain de mie) to keep the loaf square.
- Knead to windowpane: for this loaf, you can use the windowpane test to see if the dough has been kneaded long enough. (Stretch a small piece of dough between your fingers to check if light passes through without the dough tearing.) I do recommend using a stand mixer if you have one or plan to get a workout in with about 15 minutes of hand kneading.
More Sourdough Discard Recipes


If you make this Soft Sourdough Discard Sandwich Bread recipe or any other sourdough recipes on the Baked Collective, please take a moment to rate the recipe and leave a comment below. It’s such a help to others who want to try the recipe. For more baking, follow along on Instagram, TikTok, and YouTube.
Sourdough Discard Sandwich Bread
Equipment
- Measuring cups and spoons or a digital kitchen scale *Scale highly recommended
- Stand mixer
- Bread tin 26cm (10 in.) length ideal
Ingredients
- 250 ml whole milk, 1 cup
- 150 grams sourdough discard, ¾ cup
- 1 tablespoon olive oil
- 400 grams all-purpose flour, ~3 cups
- 2 tablespoons granulated sugar
- 2 ¼ teaspoons instant yeast
- 1 teaspoon fine sea salt
- Butter for greasing
Instructions
- Add the milk, discard, and oil to the bowl of a standing mixer (or a large bowl if kneading by hand). Whisk to combine.250 ml whole milk, 150 grams sourdough discard, 1 tablespoon olive oil
- Add the flour, sugar, yeast, and salt. Stir to mix into a shaggy dough.400 grams all-purpose flour, 2 tablespoons granulated sugar, 2 ¼ teaspoons instant yeast, 1 teaspoon fine sea salt
- Knead the dough for 12 to 15 minutes, on low speed with a stand mixer fitted with the dough hook or by hand. The dough should pass a windowpane test when it's ready.
- Cover the mixing bowl with a tea towel and a large plate and set aside to rise at room temperature until doubled in size, about 1 hour.
- Grease a bread tin liberally with butter and set aside. Turn the dough out onto a lightly floured surface and pat into a rectangle. Roll into a tight log and place into the prepared bread tin seam-side down.
- Cover and set aside to rise again at room temperature for about 45 minutes, or until the dough has risen to 2.5cm (~1 in.) above the bread tin if using a standard 26cm (10 in.) tin.
- Preheat the oven to 400°F (200°C) and set the rack in the centre of the oven. Bake the bread for 30 to 40 minutes* and cover loosely with foil if the top is browning too much. The loaf should be a deep golden brown and the top will feel firm to the touch when baked. The internal temperature will be around 200°F (93°C).
- Brush the top of the bread with butter as soon as it comes out of the oven. Cool on a wire rack for 15 minutes before removing from the tin** and cooling fully before slicing.
Notes
Nutrition
Nutrition information is an estimate and is provided as a courtesy. For precise nutritional data, please calculate it independently using your preferred nutrition calculator.
This post may contain affiliate links. If you purchase through these links, we may earn a small commission, at no additional cost to you.
 Did you make this recipe?Please consider leaving us a rating and a comment. It helps others find our work, which genuinely supports what we do. Thank you!