A cute and spooky twist on our classic rice krispie treats, these Halloween rice krispie treats are easy and fun to make with kids! This post is set up a little bit differently from normal. You can jump to each type of treat decoration style in the list below, or scroll through to see what's used for each and step-by-step images.
Try our Halloween sugar cookies and pumpkin-shaped cinnamon sugar cookies for some also not-so-spooky (but equally cute!) desserts.
Jump to:
Ingredients
Ingredient Notes and Substitutions
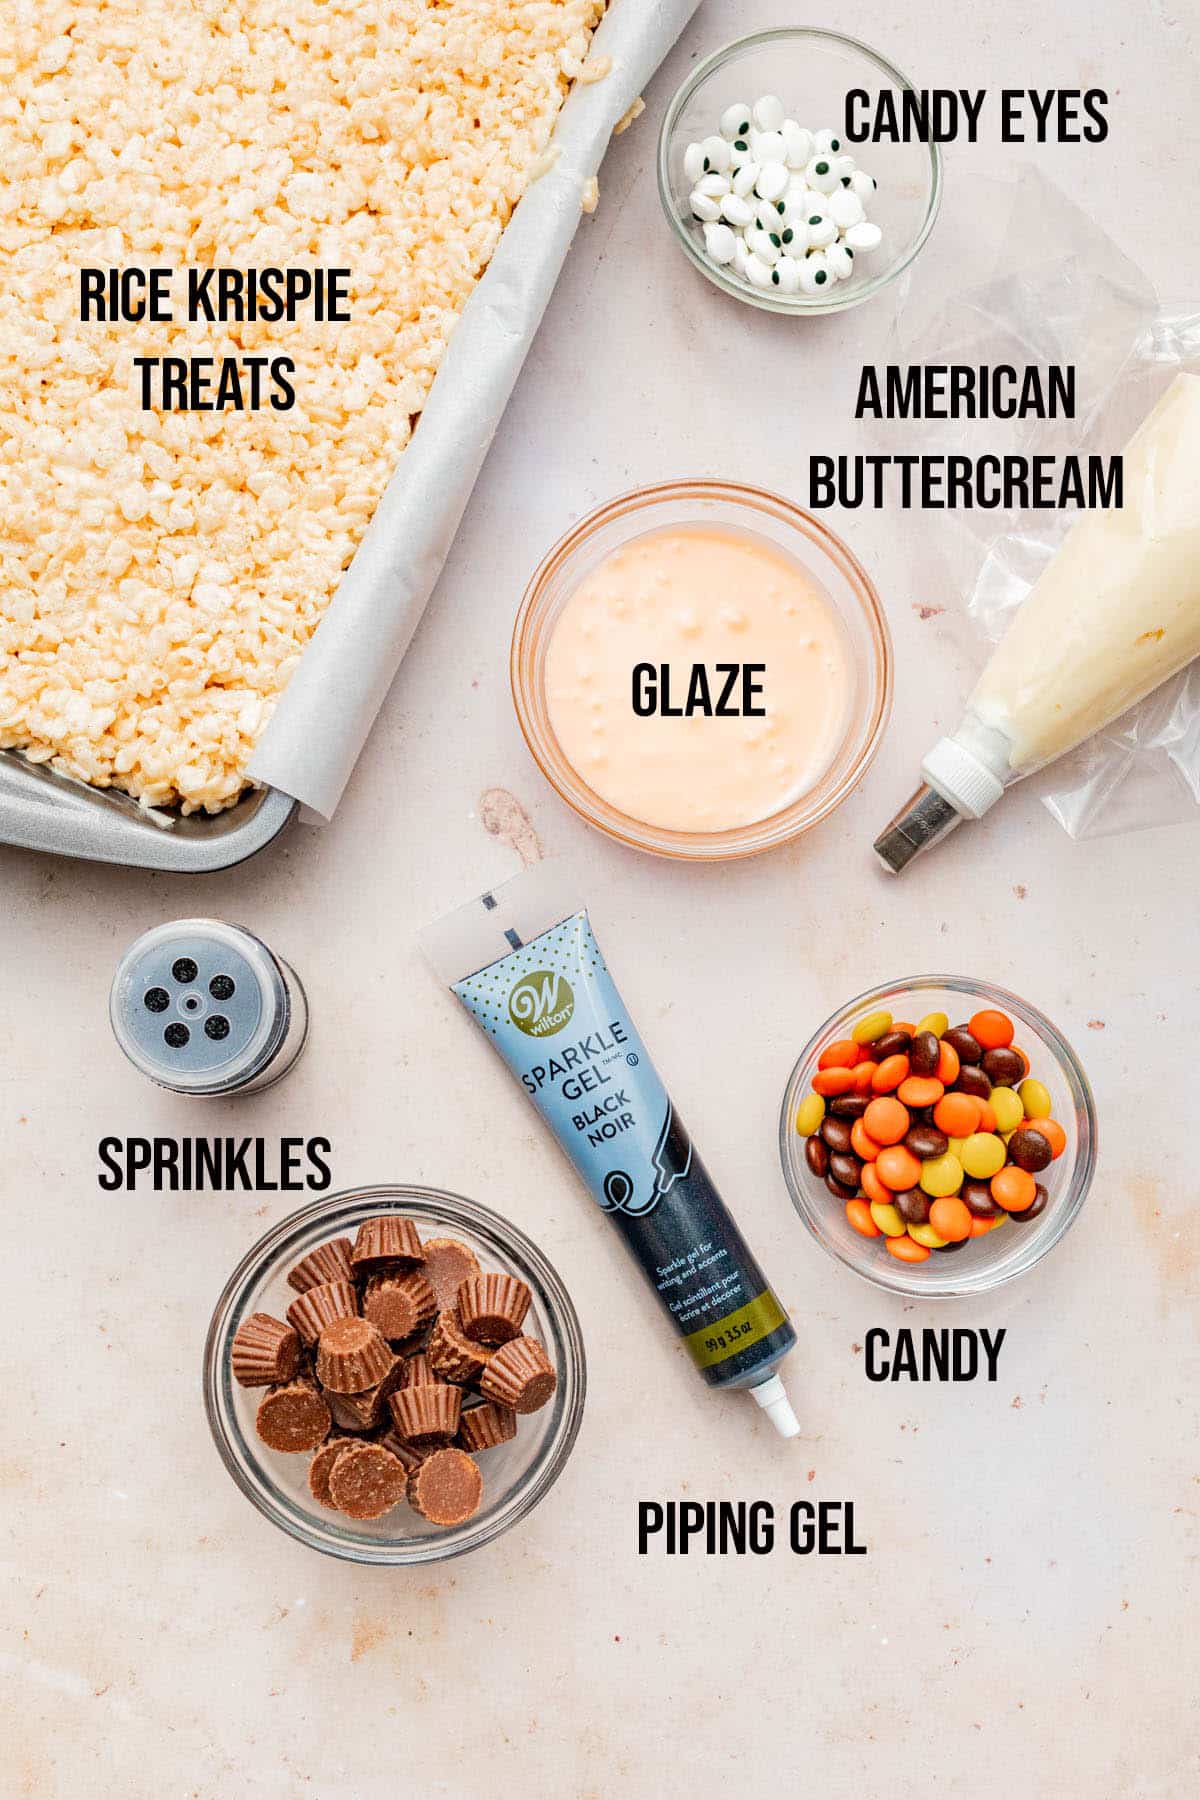
- Piping gel: use melted chocolate in place of the black piping gel, or tint some buttercream black to use instead. We like using the gel pictured as it's so kid-friendly and easy.
- Glaze: if you don't want to use glaze, try candy melts instead. They're already coloured and easy to melt in the microwave.
- Add-ins: try flavouring the base of the treats with pumpkin pie spice for a seasonal twist.
- Make it vegan: use vegan marshmallows (we like Dandies), vegan butter, and our vegan vanilla buttercream for frosting.
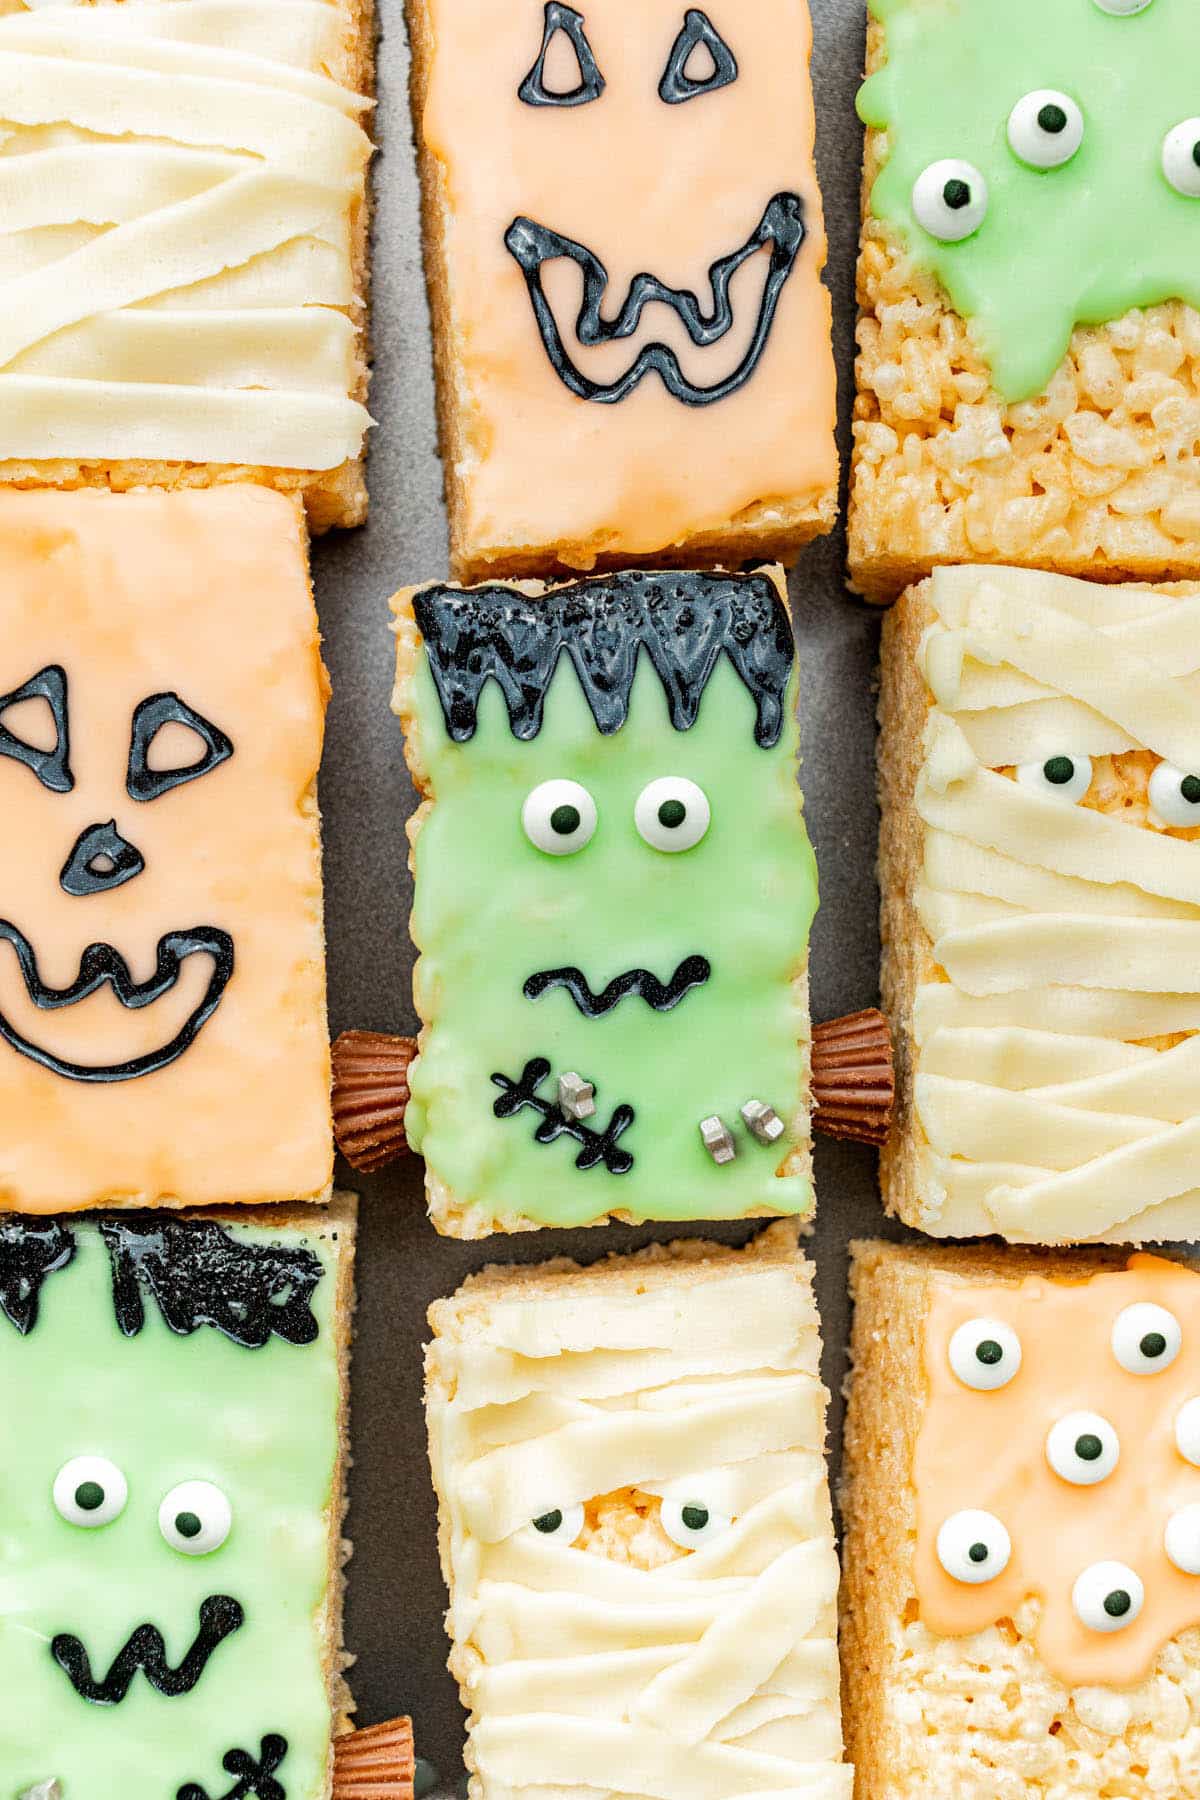
Mummy Treats
Step by Step
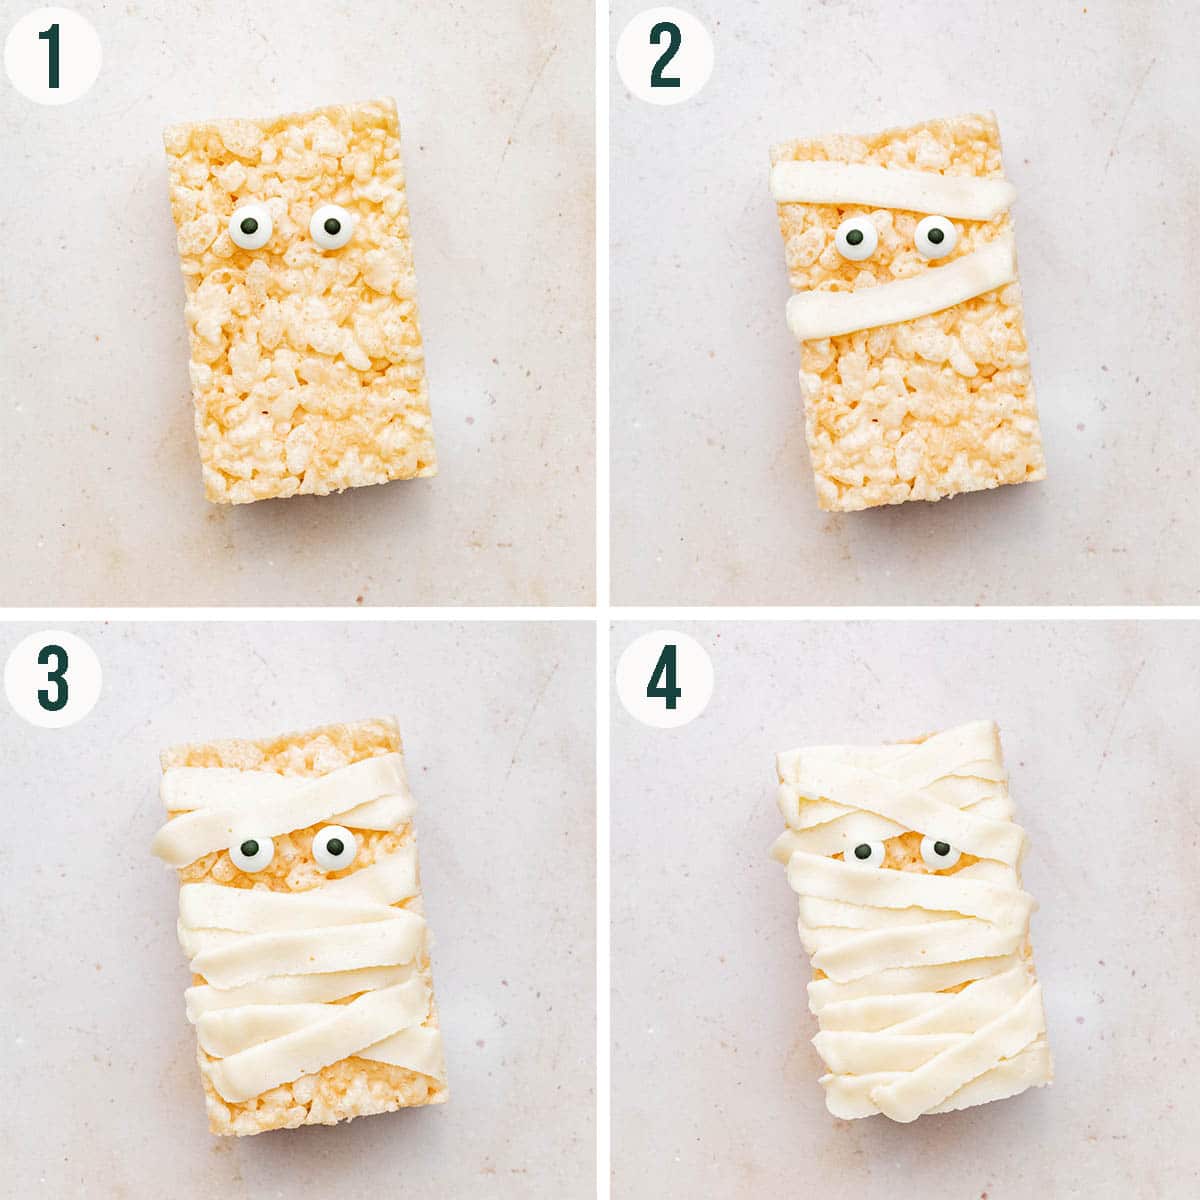
Step 1: add the eyes first, attaching with a dab of buttercream.
Step 2: pipe criss-crossing strips of frosting.
Step 3: don't cover the eyes, but frosting touching the eyes is okay!
Step 4: repeat with the strips until covered.
Many Eyed Monster Treats

Step by Step
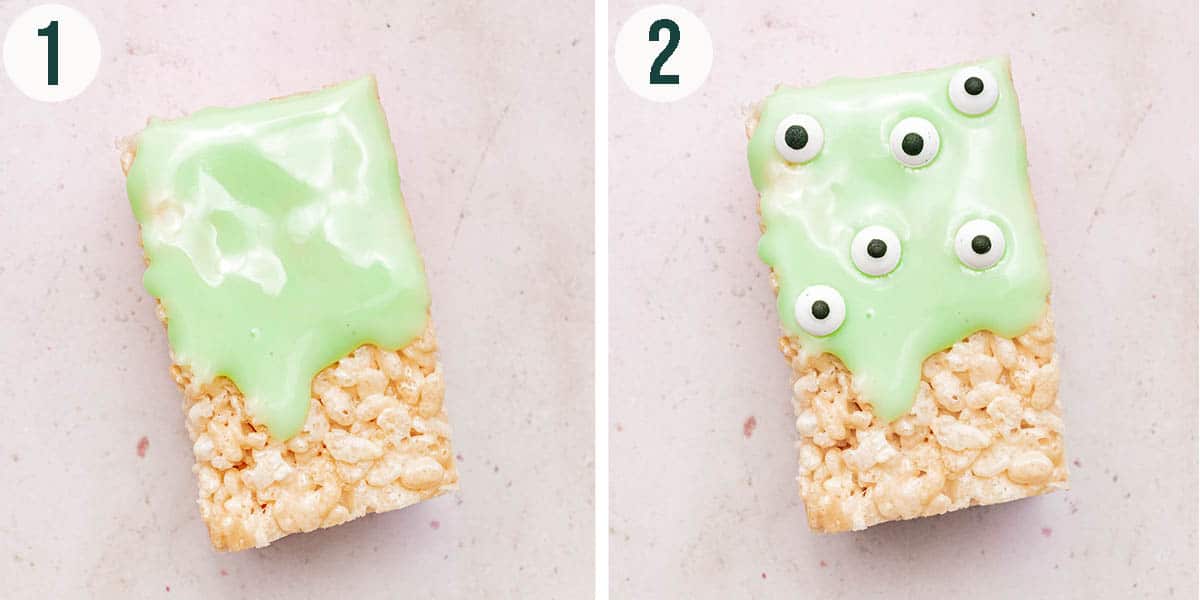
Step 1: spoon an uneven, dripped layer of glaze on two-thirds of the treat.
Step 2: top with several candy eyes before the glaze dries.
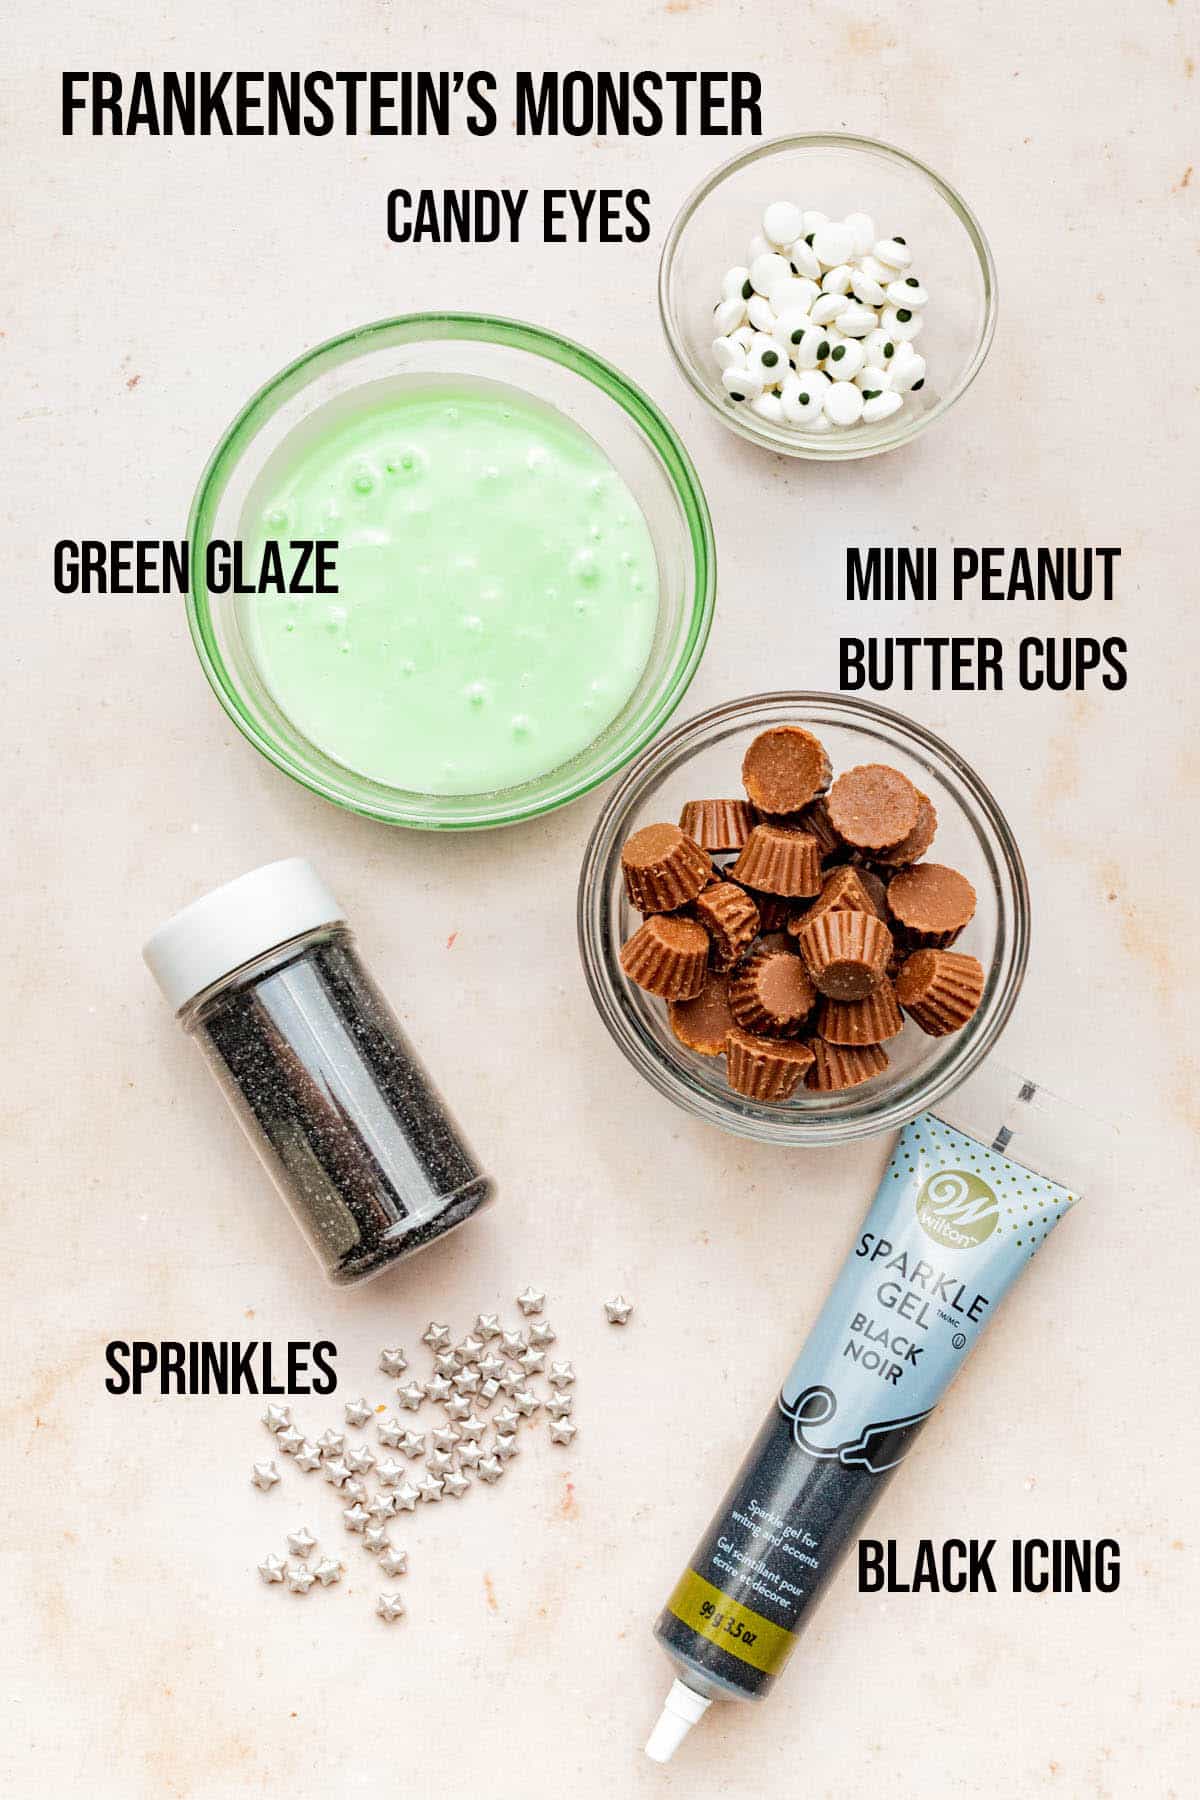
Frankenstein Treats
Step by Step
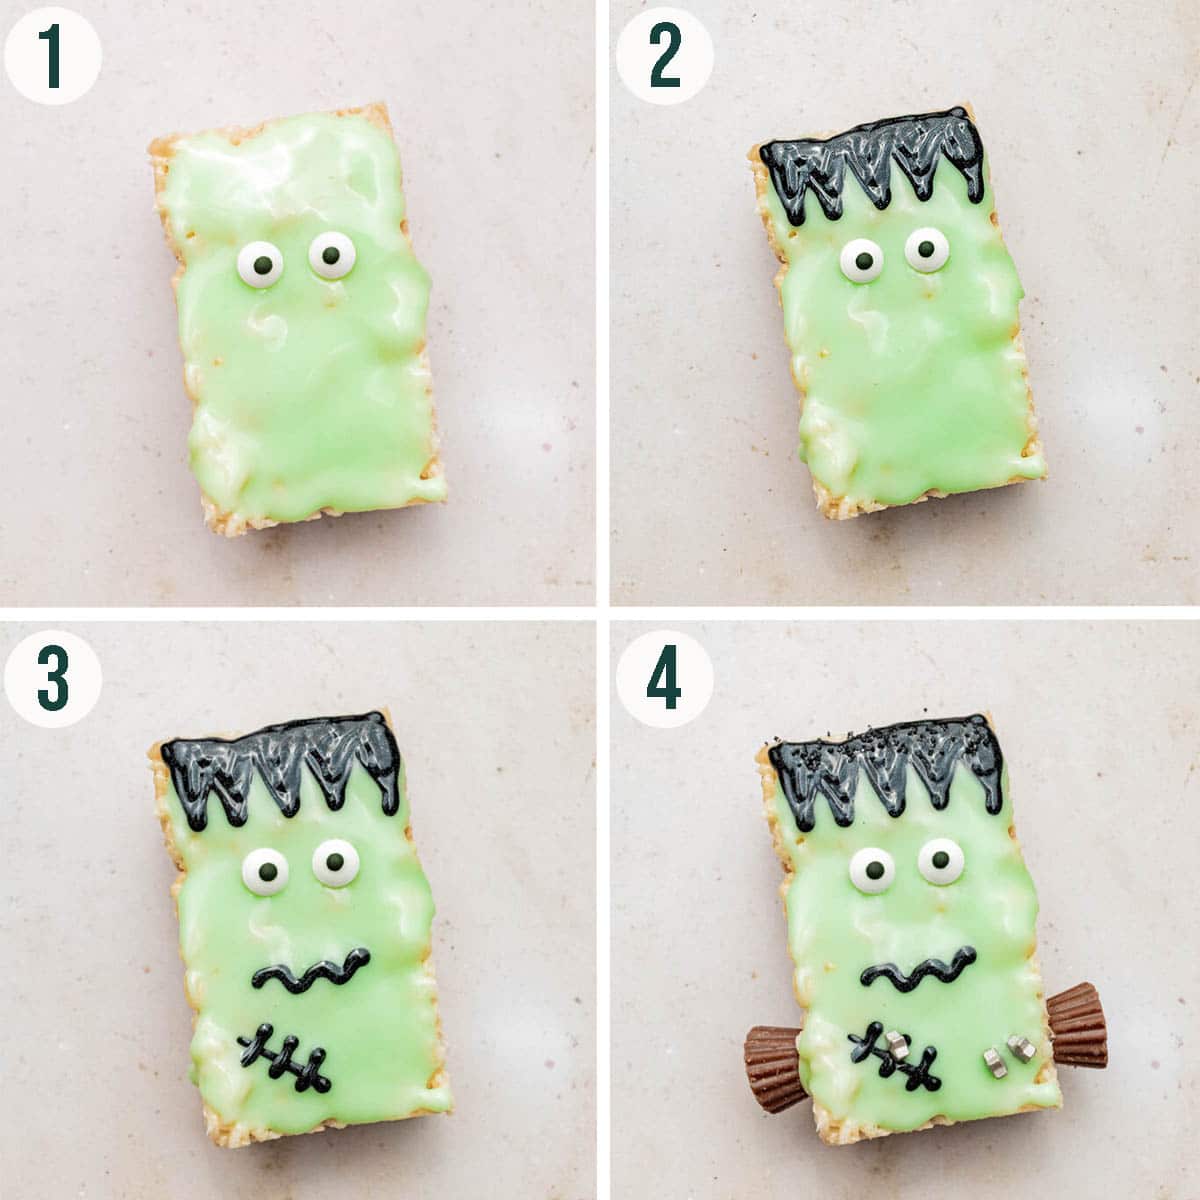
Step 1: top with a layer of glaze and add two eyes.
Step 2: using black icing, pipe attached upside-down triangles at the top of the treat for hair.
Step 3: pipe a squiggly line for the mouth and an intersected line as stitches.
Step 4: add silver sprinkles for staples, and mini peanut butter cups as neck bolts (attach with more glaze).
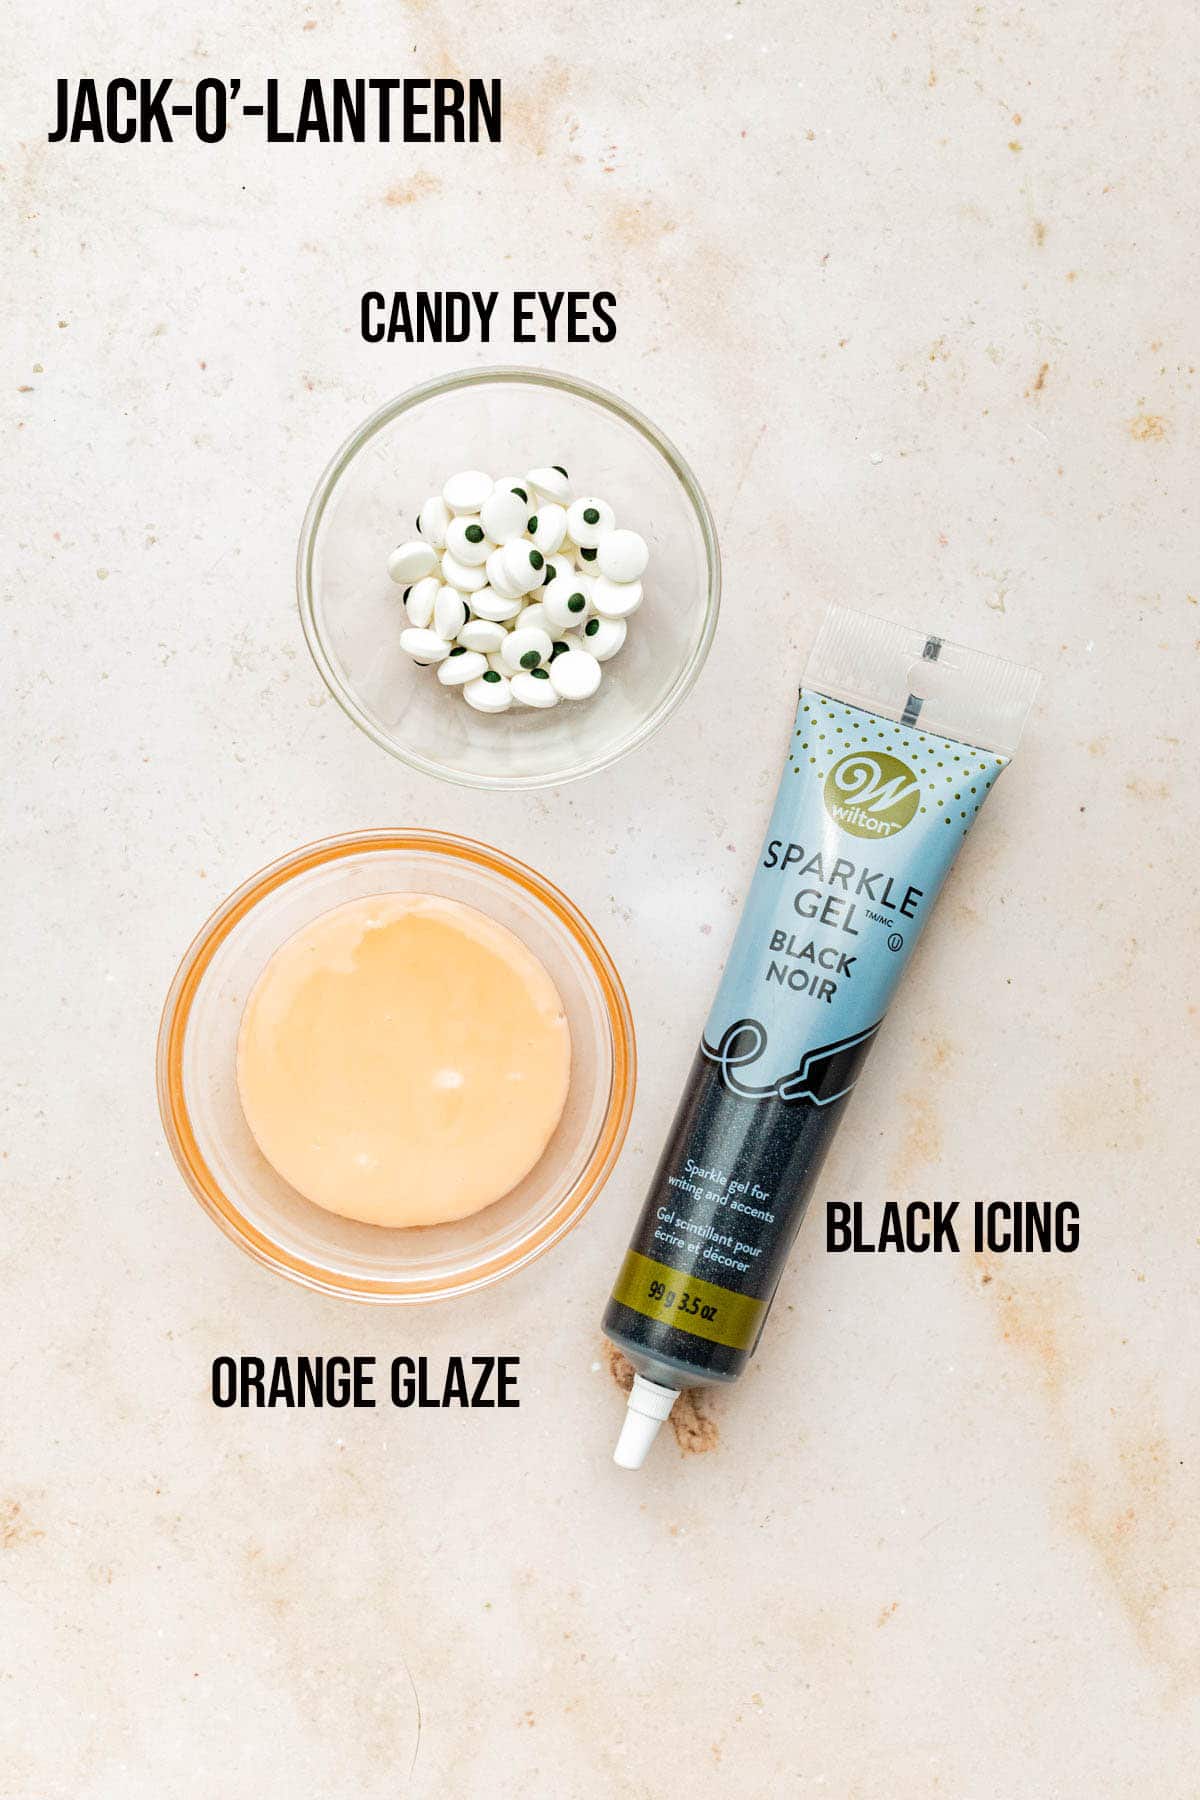
Jack-O'-Lantern Treats
Step by Step
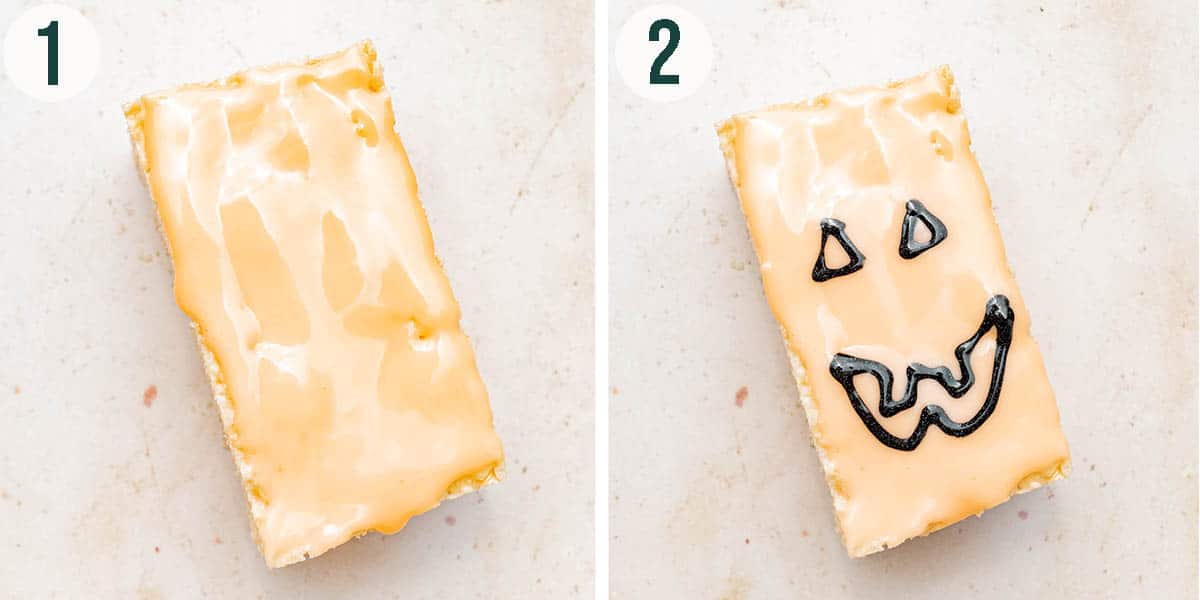
Step 1: fully cover the top of the treat in orange glaze.
Step 2: pipe a jack-o-lantern shape with the black frosting and optionally add spooky eyes.
Top Tips
- Colour the base: add a little orange or green food colouring to the marshmallow base of the treats while cooking if you'd like.
- Make a double batch: you'll need a double batch of the rice krispie treats to make enough to frost with the different variations. Make them in a rectangular dish so that you can cut the longer rectangles rather than squares.
Recipe Notes
We use this American buttercream for piping on the mummy treats. The glaze topping the others is a simple icing sugar and milk glaze, with food colouring added as needed.
Beyond what we've outlined here, there are lots of other Halloween rice krispie treat options! Think ghosts, spiders, and vampires (pipe fangs or use large white sprinkles). Or go more cute with pumpkin cookie cutters and sweet faces.
FAQ
How long do Halloween rice krispie treats last?
These are best eaten the day they're made, because the buttercream doesn't keep very well at room temperature and the rice krispie base gets too hard in the fridge.
Is it OK to use old marshmallows for Rice Krispie Treats?
It's best to use marshmallows from a freshly opened bag so that they mix properly after melting. Old marshmallows are a bit too hard to work properly.
Do you have to refrigerate rice krispie treats after you make them?
No, and they're not very nice when stored in the fridge. They get pretty hard and dry from the cold.


If you make this Halloween Rice Krispie Treat recipe or any other no-bake recipes on the Baked Collective, please take a moment to rate the recipe and leave a comment below. It’s such a help to others who want to try the recipe. For more baking, follow along on Instagram, TikTok, and YouTube.
Halloween Rice Krispie Treats
Equipment
- Fine mesh sieve
- 2 Mixing bowl
- Measuring cups and spoons
- Piping bag
- Flat piping tip
- Whisk
Ingredients
- 2 batches Classic Rice Krispie Treats, cut into rectangles
- Easy Vanilla Frosting
- Candy eyes
- Black piping gel
- Orange food colouring
- Green food colouring
- Metallic sprinkles, we used stars
- Mini peanut butter cups
For the glaze:
- ½ cup icing sugar
- ¼ teaspoon vanilla extract
- 1 tablespoon milk
- Food colouring
Instructions
- To make the glaze, sift the icing sugar into a bowl. Whisk in the vanilla extract. Add the milk a half-teaspoon at a time, whisking between each addition, until the glaze reaches the desired consistency.
- Divide between two bowls and tint half with green food colouring, and half with orange. Set aside.
Mummy Treats
- Attach two candy eyes with dabs of icing. Use a piping bag fitted with a flat tip, and pipe strips of buttercream criss-crossing over top of the rice krispie treat. Don't cover the eyes.
Many-Eyed-Monster Treats
- Spoon an uneven, drippy-looking layer of glaze on two-thirds of the treat. Top with several candy eyes.
Frankenstein Treats
- Top with a layer of green glaze and add two eyes. Using black piping gel, pipe attached upside-down triangles at the top of the treat for hair.
- Pipe a squiggly line for the mouth and an intersected line as stitches. Add silver sprinkles for staples, and mini peanut butter cups as neck bolts (attach with more glaze).
Jack-o'-Lantern Treats
- Fully cover the top of the treat in orange glaze. Pipe a jack-o-lantern shape with the black piping gel and optionally add spooky eyes.
Notes
Nutrition
Nutrition information is an estimate and is provided as a courtesy. For precise nutritional data, please calculate it independently using your preferred nutrition calculator.
This post may contain affiliate links. If you purchase through these links, we may earn a small commission, at no additional cost to you.
 Did you make this recipe?Please consider leaving us a rating and a comment. It helps others find our work, which genuinely supports what we do. Thank you!